Sending leads from ConvertBox into FluentCRM is accomplished using Webhooks. Webhooks are easily set up inside of FluentCRM to determine what lists, tags, and segments your leads go into when they come from ConvertBox. Using ConvertBox’s conditional actions, leads can be tagged and segmented based on buttons, forms, and several more features inside of ConvertBox.
Let’s go through these options one by one and I’ll show you how easy it is to set up robust lead tagging and segmenting using ConvertBox and then send those into FluentCRM for email automations.
Create Webhooks in FluentCRM
I recommend creating a webhook in Fluent CRM for each tag you’ll want to apply to your leads/subscribers. The broader you are in your planning, the more you can re-use these webhooks in the future. To find webhooks in FluentCRM, simple navigate to:
Settings > Incomming Web Hooks > Create Webhook
Create the name of the webhook (visible only to you), then choose the list, tags, and status for the subscriber. Webhooks are awesome because you can apply multiple tags and lists, but I recommend you keep it simple!
Tip: Come up with a naming system for your webhooks to help you keep track of them.
Leads from a ConvertBox Form to a FluentCRM List / Tag
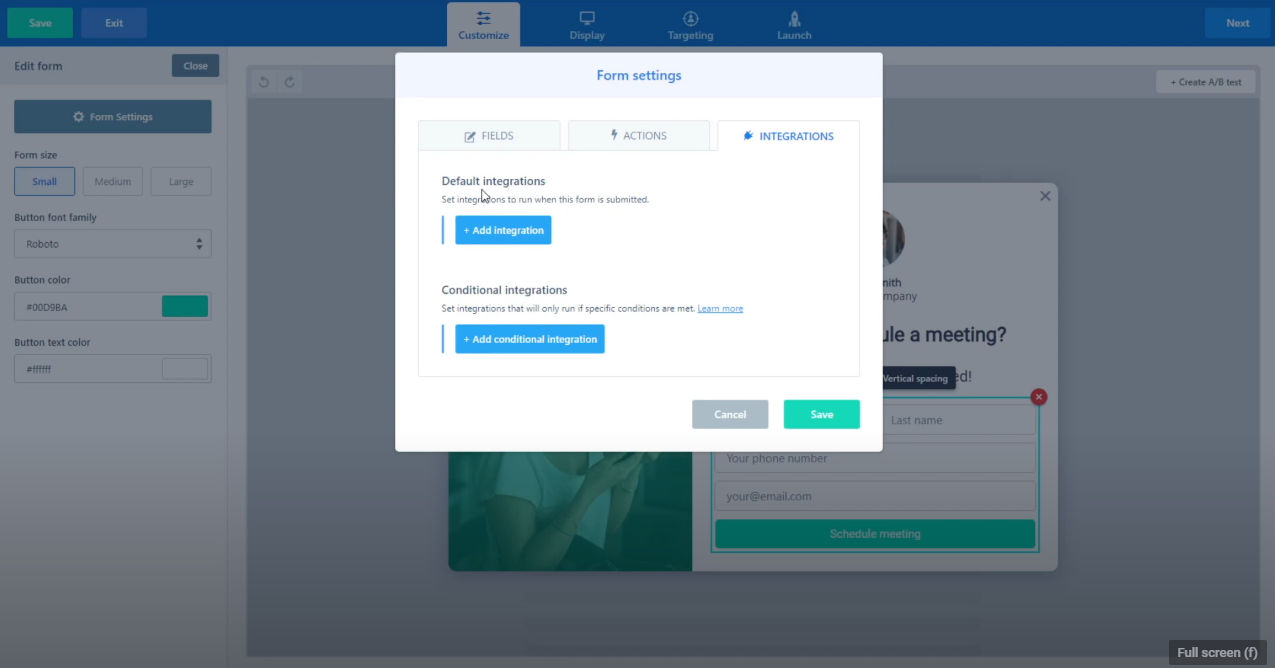
To connect a ConvertBox form to FluentCRM, click the form element in ConvertBox. In the upper left, choose Form Settings and then choose the Integrations tab in the Form Settings window.

If you’re simply having someone fill out a form for an opt-in like a lead magnet, or using the form as a newsletter signup, then you can use the “Default Integrations” option in ConvertBox’s form integrations. The default integration will always trigger when someone completes the form.
Segment Leads Based on Button Clicks in ConvertBox
ConvertBox can store information from buttons people click on and then pass that information through the form they submit. This allows you to tag and segment a user based on choices.

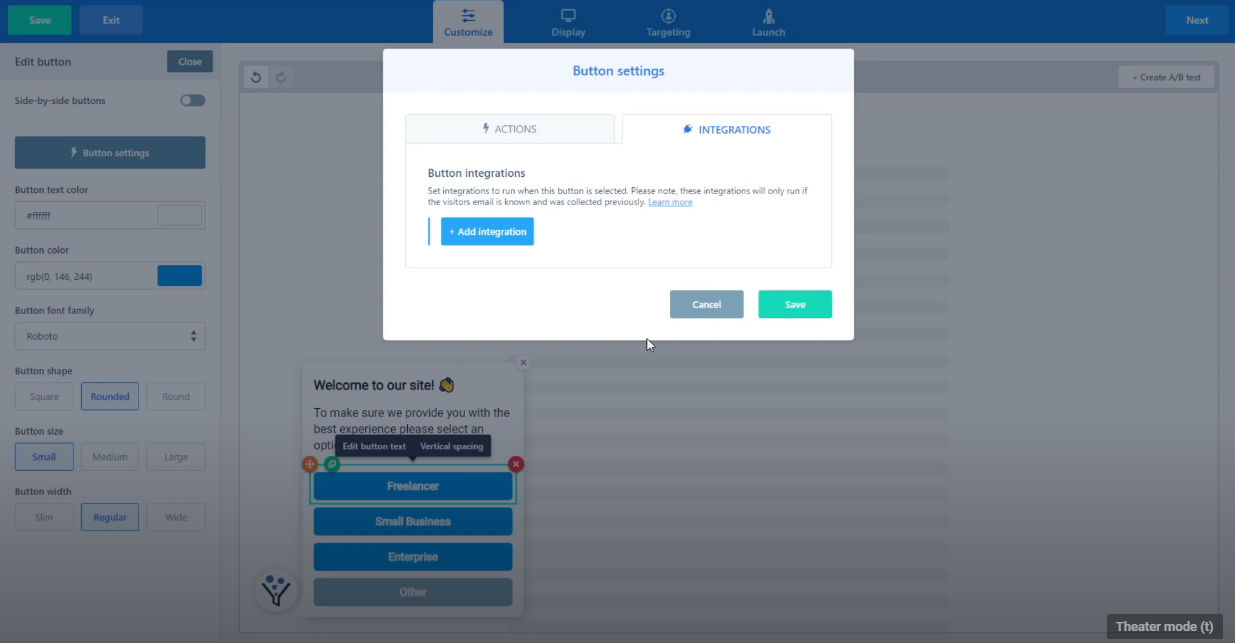
Click on the button you wish to create an integration for and then choose Button Settings, choose the integrations tab, and then add integration. From here you choose Webhook and paste in the link for the webhook you created earlier for the tag or list you want to apply.
Under the ‘actions’ tab you’ll also want to make sure that you’ve chosen “go to next step” so that the button they click also advances them along.
This is a great option for a ConvertBox that uses buttons for people to self-segment and tell you a bit about themselves. For example, you might ask a question about the size of someone’s business or how they get their leads, or whether they’re a course creator or a consultant. You can then pass that info over to FluentCRM where you can properly tag and manage these subscribers for current and/or future email automations or campaigns. Brilliant strategy to use.
Sending Conditional Data to FluentCRM from ConvertBox
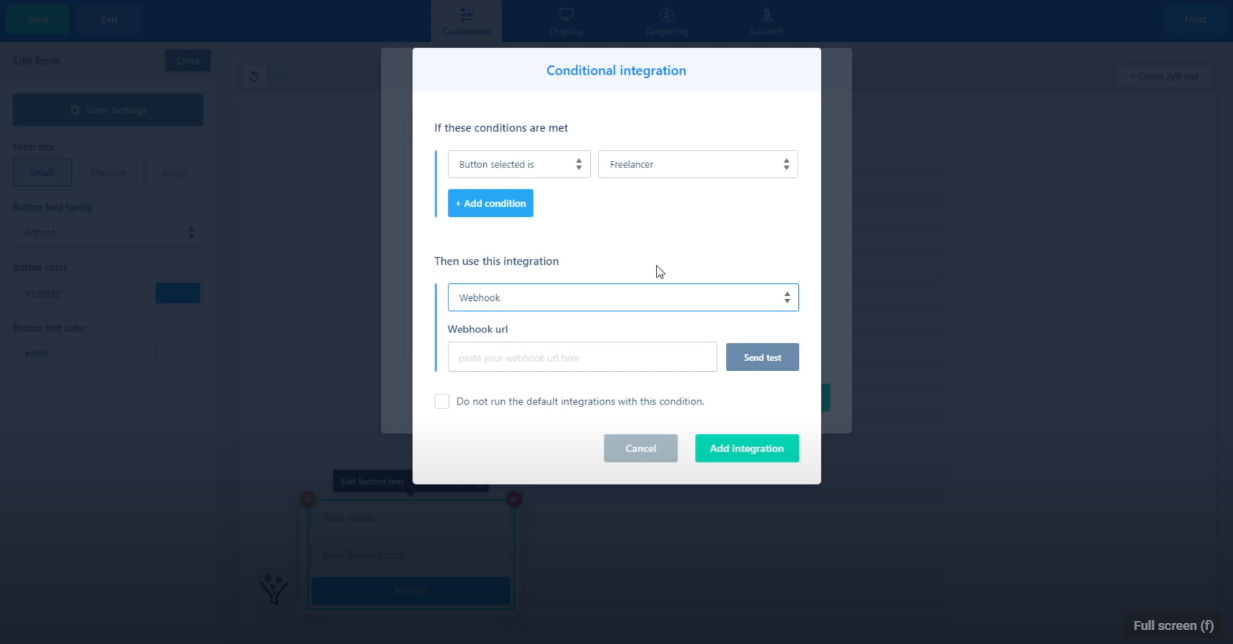
Now that you’ve properly identified people based on their button presses, you can go to your form in your ConvertBox and navigate back to the form settings > integrations > but now instead of Default Integration you want to choose “Conditional integration”.

Set the condition (Button selected) to the button you want to integrate. Now paste in the Webhook url you created in FluentCRM that matches what this button should tag the lead with. Repeat this process for each webhook/button.
Your ConvertBox will now only apply the tag based on the webhook you assigned to each of the buttons!
This level of conditional segmentation is awesome, and the fact that you can send these leads directly into your email list hosted on your own website, and then email these leads without paying the enormous prices charged by email marketing providers, is a huge win for tech stack enthusiasts like us.

