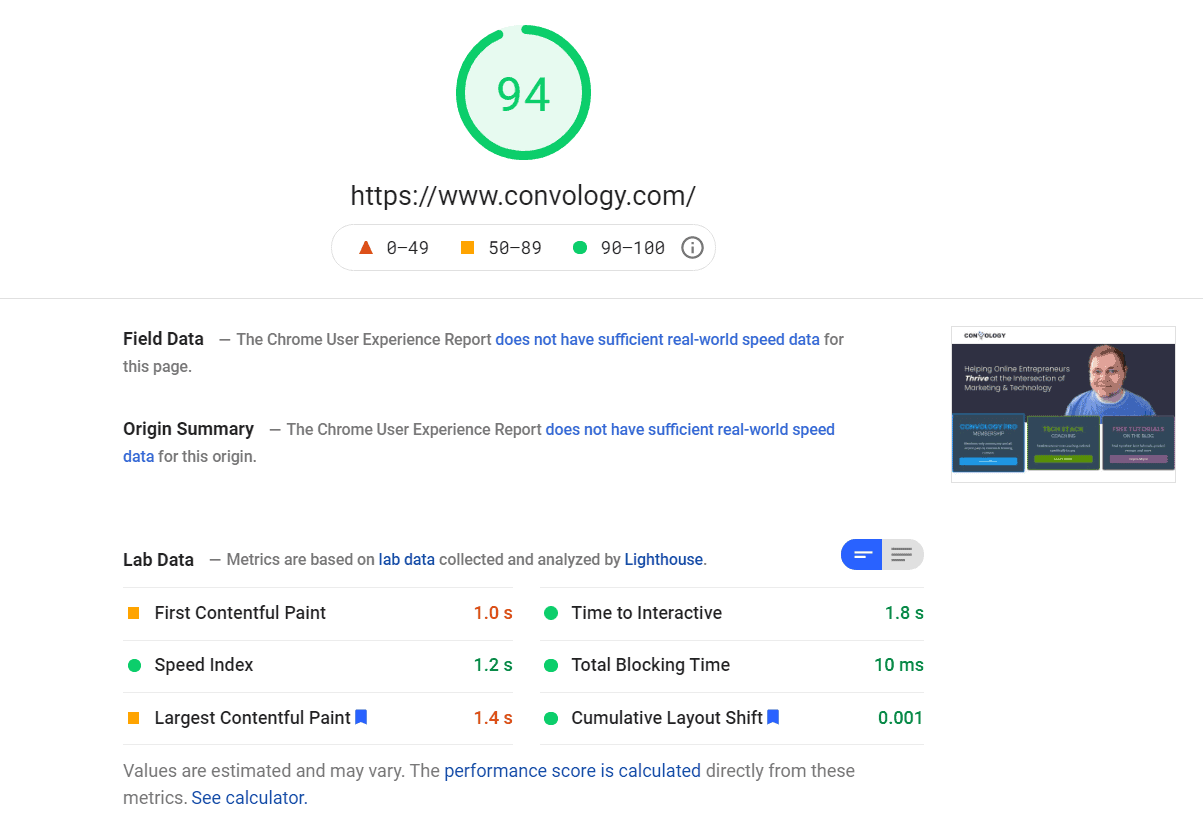
Thrive Suite, as a collection of plugins for WordPress by Thrive Themes, is already extremely well optimized. However, by its very nature, it’s still a collection of highly-dynamic plugins that will increase the resources needed in order to operate properly.
To get the most performance out of your Thrive Suite website, I have created a collection of tips and tools you can use to optimize your site to squeeze out every ounce of performance.
This post will continually be updated with the latest recommendations for improving your website’s speed and CWV stats while using Thrive Suite’s theme an plugins.
Last updated: July 2024.
Links in this post may be affiliate links which means that I get a commission when you make a purchase. In some cases you actually save money when you use my links. Everything I recommend in this post is what I currently use and/or pay for myself, and no one has sponsored any of this content.

Choose the Right Hosting Provider for Thrive Suite
The single most important thing you can do to ensure your Thrive Suite is running fast is to choose the right host. You DO NOT want to go cheap on hosting. Hosting accounts for the biggest gains AND losses on speed, and it’s also the hardest of all the options in this entire post to change.
While there are many options available, my two recommendations that I have tried and currently use are detailed below.

BigScoots
I use BigScoots to host my most important Thrive Suite websites because they are an actual “fully-managed” host.
BigScoots will do almost everything I recommend in this post for you when they migrate your site. They’ll set up your DNS/CDN, configure your caching plugin, ensure optimal server-side settings for PHP and your database, and provide you with all of the resources your Thrive Suite site needs to run at incredible speeds.
Looking for more information on BigScoots? I got you covered. Check out these two articles for more on why I went with BigScoots to host my Thrive Suite sites.

WPX
If you have a smaller website that doesn’t utilize a lot of dynamic content, meaning you’re not using member plugins, having people create accounts and log in to access content, and you’re not using plugins like WooCommerce, then WPX is a solid choice.
I still host over 50 sites on WPX! It’s perfect for smaller brochure sites that don’t have a ton of traffic, and it’s plenty fast to get the job done.
WPX offers the added benefit of having a CDN build right into their hosting platform (more on that in the CDN section below) and

Enable Project Lightspeed
Project Lightspeed is Thrive’s built-in speed optimization for Thrive Theme Builder that impacts your entire site’s performance. Thrive specifically built Lightspeed in response to Core Web Vitals and the importance of having a website that is properly optimized.
Enabling Lightspeed is simple and safe.
In Thrive Theme Builder go to the Site Speed option at the bottom of the inset menu on the left. Otherwise you can access this menu by going to your Thrive Dashboard and go to the Project Lightspeed section.
Select Project Lightspeed.
Click Analyze this site.
Depending on the size of your website, this could take a few seconds to a few minutes. When the tool has completed, toggle on the option to display optimized assets.
Be sure to clear your cache on the website and server.
Optimize Google Fonts
Part of the optimization tools built into Thrive Theme Builder is the option to optimize Google Fonts delivery. Some of the speed testing tools give you points for optimizing font delivery. While I haven’t noticed any measurable speed increases, or performance improvements, this option can be enabled. You’ll find it under Font Settings in the Project Lightspeed section.
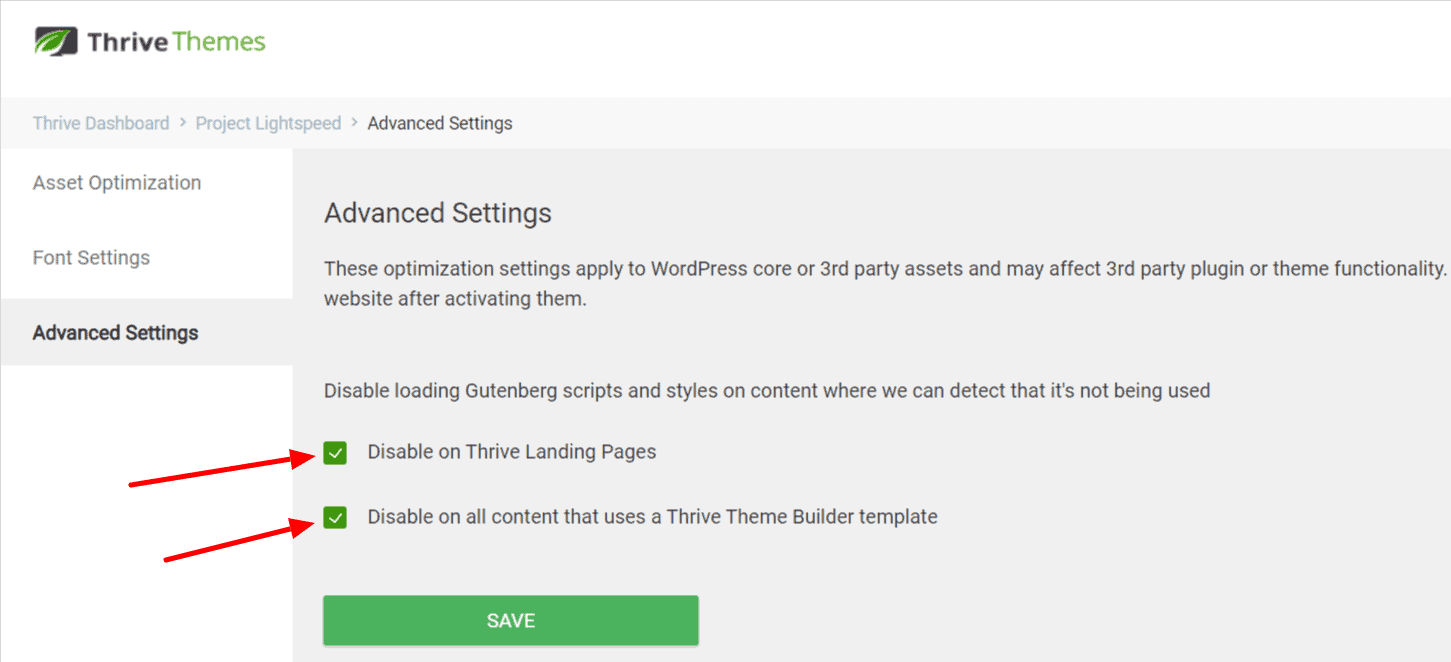
Disable Gutenberg and WooCommerce When Not In Use
If you are not use Gutenberg, which is probably most of you if you are Thrive users, then you want to disable these scripts from loading. More scripts = more stuff to load.
You can disable these scripts under the Advanced settings of Project Lightspeed. Just check the box and press save.
If you do not have WooCommerce on your website, you won’t see the WooCommerce checkboxes and therefore they will not load on your site anyway.

Optimize Images for Size and Quality
Image optimization is high on the list of most important things you can do to improve the speed of your website. The most common mistake people make is simply uploading raw images from stock photo sites or
Find the smallest resolution that works
I typically use 800x450px for my featured images because I don’t use big widescreen images. If I did, I still would stay around 1200px by 720px.
Choose the right file format
I recommend jpg’s for photos and PNGs for logos. Regardless of the format you choose
Get the smallest file size possible
How small should you file size be? As small as possible. Most images on this page are under 20kb. Most of my featured images for blog posts are under 80kb. I’ve tried to keep every image on this entire site under 150kb.
While some industries may require larger, crisper, higher-fidelity photos, most don’t.

Use Shortpixel to Compress and Optimize Images
Shortpixel offers a free online image compressor. It’s as easy as dropping your image into the optimizer and waiting 10 seconds. In most cases, they shave off 50-70% of the file size.

The image above shows actual images in this post being optimized. As you can see, that’s a significant file size savings on every one of the images.

Use a Caching Plugin
Caching plugins are practically mandatory. There are several free and paid options, but I’m going to recommend the two that I currently use with Thrive Suite.
W3 Total Cache
The easiest option is W3 Total Cache. Thrive Theme Builder has a built-in compatibility with W3 Total Cache and can be enabled under the Site Speed options. This one-click install, and one-click optimize, makes this an easy choice.
I find W3 Total Cache works great with WPX Hosting.
Cache Enabler
Cache Enabler works great with Thrive Suite. It’s the default caching plugin installed and configured by BigScoots if you host with them and have them migrate your site. Its really lightweight and they’ll get you set up with it. This is what I currently use on this website, my wife’s ecommerce site built using WooCommerce, my membership site, and more.

Manage Your DNS Through Cloudflare
A recent addition to my site speed tech stack is Cloudflare for DNS management. Cloudflare is completely free for all of the features that we need.
It’s easy to set up if you are at all comfortable with DNS or Nameservers.
Cloudflare gives you two nameservers that you simply update at your domain name registrar. This allows you to log in to Cloudflare and set up your DNS for things like subdomains, integrations with other tools that are using CNAME’s and A Records, etc.
How Cloudflare Works
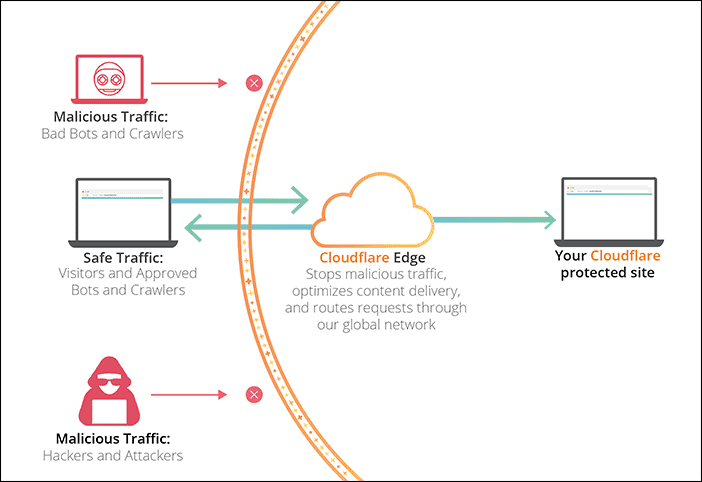
Cloudflare optimizes content delivery (more below in the CDN section) and it also blocks malicious bots and traffic from hitting your site. The nice thing about it is that it stops them BEFORE they get to your site.
I didn’t expect this to work as well as it does. I thought, “How much faster could this possibly feel?”
It actually feels faster! You just have to try it for yourself.

Use a CDN (Content Delivery Network)
A CDN basically makes your content load from different geographic locations based on where your visitors are accessing your site from.
Cloudflare
When your DNS are managed through Cloudflare, you automatically have a CDN built into your setup at the DNS level instead of having your asset URLS rewritten.
I absolutely LOVE that Cloudflare’s setup for the CDN is literally a “zero configuration” setup. As long as your DNS are going through Cloudflare, you’re set.

Bunnynet CDN
An extremely low-cost option is BunnyNet for your CDN. Setup is really simple, too, and you can integrate it directly with W3 Total Cache.
Check out my post and guide all about BunnyCDN. I walk you through everything you need to know.

WPX Cloud CDN
If you are hosting with WPX, they offer a built-in CDN. It’s literally a one-click toggle. It works great, but it is a little aggressive and can sometimes cause Thrive Architect to stall out when saving. If this happens to you, wait a 20 seconds and press Ctrl (or Cmd) and S to save. It’ll usually go through.

Remove Unnecessary Plugins
I’m always astonished when I see the backend of people’s websites and they’re packed full of plugins. My sites are extremely light on plugins because Thrive Suite gives you so much of what you need.
Just a few of the features you can use Thrive Suite for and uninstall those bloated, out of date, and poorly coded plugins:
- Adding code to your header/footer
- Customizing your login screen
- Putting your site in maintenance mode
- Adding Google Analytics
- User access manager for permissions
- Icons
- Social Sharing
- Video players
Thrive Suite and a caching plugin are practically all you need. Avoid adding ANYTHING else unless it is extremely necessary to the performance of your website.

Ensure Optimal PHP Settings are Enabled
If you’re on hosting that is not one of the ones that I recommend, you may need to make sure that your PHP settings are optimized. Some of the cheaper hosts turn these settings way, way too low.
The Ideal PHP Settings for Thrive Suite
- the PHP memory limit set to 512MB
- the max post size bigger or equal to 50MB
- the WP-memory limit set to 128/256 MB
- the max upload size should be 50 MB
- the max input vars 2500
- and ideally the max execution time should be around 300.
[Source: Thrive Themes Knowledge Base]
If you’re on BigScoots or WPX, you don’t need to even worry about these options.

Thrive Theme Builder’s “Kwik” Starter Theme
An honorable mention that I wanted to plug is Thrive Theme Builder’s “Kwik” theme which is designed to be minimalistic and follow a lot of the Core Web Vital “best practices” like keeping the ‘above the fold’ area limited and using system fonts.

It’s important for you to understand that this only applies to the EXACT designs they’ve created for the starter template. If you’re completely unsure where to begin with your site’s design and want a zippy fast starting point, then Kwik is a decent choice.
That said, as soon as you start customizing these designs you’re basically back on par with the other starter themes.
You can customize ANY of the TTB starter themes be just as fast as the Kwik starter theme, and you DO NOT need to use Kwik in order to achieve good CWV results.
Conclusion
Thrive Suite is highly optimized. More so than most page builders. But it’s still a highly-dynamic plugin which means it’s going to add heft to your site. If you’re on a terrible host like GoDaddy or Bluehost, your site is going to be slow. If you pack it full of poorly-coded plugins, you’re doomed.
For those wanting some sort of priority list, here are my recommendations:
- Hosting
- Image optimization
- Removing junky plugins
- Caching/CDN
- Additional optimizing settings
By following these tips, achieving a fast site is totally within your reach as a Thrive user.

