Thrive Apprentice 4.0 has officially introduced drip automation to Thrive Apprentice. These drip features, combined with the other membership features in the new Thrive Apprentice, completely eliminates the need for any other plugins like WishList Member.
The drip features in Thrive Apprentice are comprehensive and easy to implement, but can feel like drinking from a fire hose if you’re not familiar with the terminology and the big picture.
In this post I’m going to walk you through everything Thrive Apprentice can do related to drip automation, the terminology, the basic thought process behind why you’d use each campaign type, and the options related to each of them.
Not yet a Thrive Apprentice user? The price is going up. Get the best price available here.
Drip Terminology in Thrive Apprentice
Thrive Apprentice introduces a few new terms that I’ll use throughout this post. These terms are in the interface and warrant definition prior to diving deeper. You can skip this section and refer back to it if you’re confused and need a definition out of context.
Drip Campaign – The drip rules you’ve created and applied to a specific course under the drip tab. A course may have multiple drip campaigns which can be used by Products.
Drip Template – The six preconfigured starting settings which define the rules behind a drip campaign.
Systematically – Regular/consistent intervals spaced apart equally such as daily, weekly, or monthly based on a relative date.
Custom Intervals – Unlock timing conditions set on each piece of content manually
Campaign Schedule – The visualization of each module and lesson with details about their unlock conditions and restriction behavior.
How to Set Up Drip Features for Thrive Apprentice Courses
First you need to navigate to the Drip tab located in the tabs among the Course Details, Content, and Access Restrictions when editing a course.
Here you will be able to create drip campaigns. Yes, you can create multiple campaigns for a single course. More on that later.
Click ‘+ Add New’ and select a drip automation template to get started. I have detailed explanations for each of the templates below.
Drip Automation Templates Available in Thrive Apprentice

Scheduled Repeating
Scheduled repeating campaigns unlock content at consistent intervals. For example: One lesson or module per week. Unlike evergreen campaigns, the content is unlocked at the same time for everyone, per the schedule that you define.
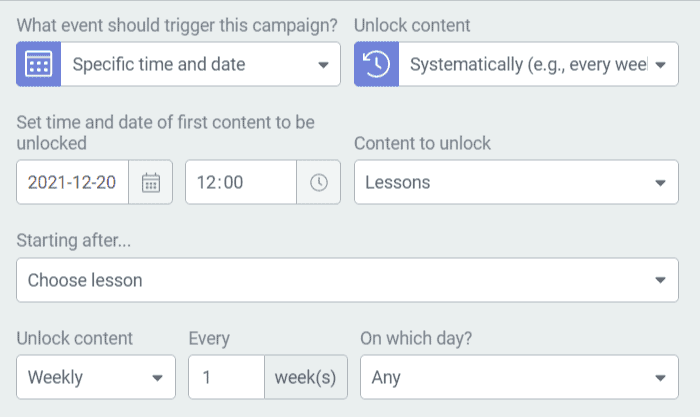
Scheduled Repeating Drip Options
Use Case: Live Launch with automated timed content unlocks
Scheduled Repeating gives you drip options that I think fit the live launch model really well.
The trigger for scheduled campaigns is a specific date and time which will be the same for everyone. This is ideal for course content that follows along with:
- Live cohorts
- Classes that meet in person and have additional material online
- First-time course launches where a lot of people will go through together
- Open/Close courses that allow in new students each year
You can choose how much content is unlocked to begin with (Start after…) and then how often content is unlocked on a repeating schedule. Typically you will have a welcome lesson unlocked with a welcome video and some resources. This allows students to access at least something to interact with and get excited about without feeling like everything is locked away.

Evergreen Repeating
Evergreen repeating campaigns unlock content at consistent intervals. For example, one lesson or module per week. Each student has their own unlock timeline depending on a trigger that you define (when the course is purchased, for example).
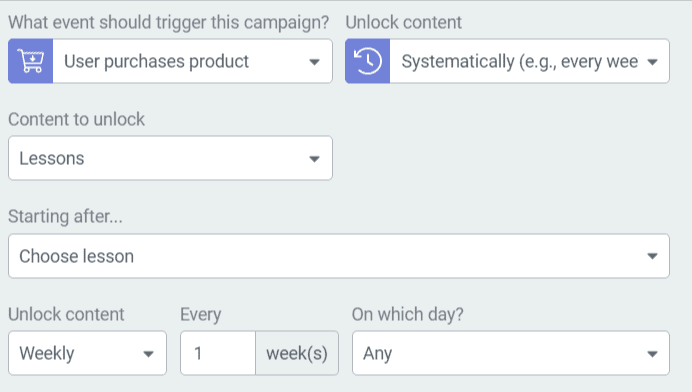
Evergreen Repeating Drip Options
Use Case: Automated enrollment coupled with any reason for control over rate of consumption
Evergreen Repeating drip is the most common type of all because it’s the simplest form of pure automation. It follows the general principles of “on-demand” consumption mixed with control over the rate of consumption. It’s so often thought of as the best of both worlds.
When someone purchases a product, regardless of when, they receive access to future content systematically on a fixed cadence.
What’s the upside to using an evergreen drip?
- Prolonged engagement to keep people coming back and getting used to interacting with your platform, brand, and hopefully seeing more of what you have more often vs. coming just a couple of times and consuming everything
- Avoiding overwhelm by limiting what someone is exposed to all at once
- Encouraging action in between sessions, giving people time to actually implement what they’ve been given before being given the next step

Day of the Week or Month
Unlock content at intervals of a specific week day or day of the month.
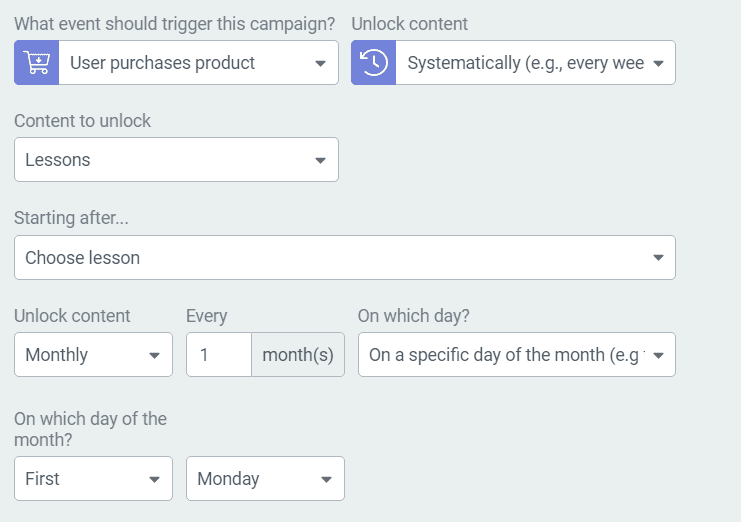
Day of the Week or Month Drip Options
Use Case: The day of the week or specific date of the month really, really matters to you
Similar to evergreen repeating, “Day of the Week or Month” releases content automatically relative to when they purchased, but only on a day of the week or a date of the month.
For example, someone can get access to the first lesson immediately but then each future lesson unlocks only on the second Wednesday of the month. You can also choose dates instead. For example, every month on the 14th of the month.
You can depart from the evergreen formula by changing the trigger to be a specific date instead of when the product is purchased, making this similar to scheduled repeating in that you start on a specific date but you also have to choose a day like “The first Monday of the month” or “The 23rd of each month” as schedules, otherwise the system flips you back to Scheduled Repeating.
The use cases here are extremely narrow.

Drip on Specific Dates
Specific dates campaigns give you flexibility to create an unlock schedule that’s defined entirely by you. For example, you may want to unlock module 1 on the 12th February and then module 2 on the 21st February. You can choose the exact unlock dates for each piece of locked content in your course.
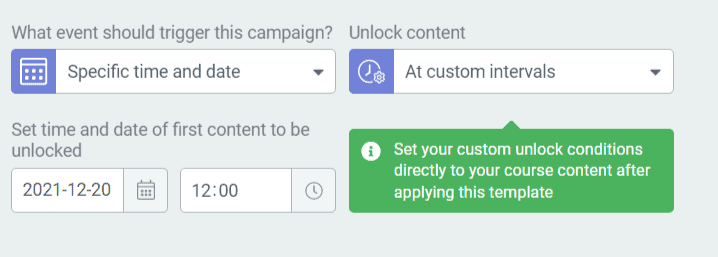
Drip on Specific Dates Options
Use Case: Live Cohorts or Live Launches that start on specific dates and content releases on specific or irregular dates
Drip on specific dates will be commonly used by cohorts and special live launches with direct interaction between the teacher and the students.
You can set the exact date and time each individual lesson unlocks. This is different from scheduled repeating because it’s not systematic at a set interval. You could unlock three lessons in a single week, one each day, then not unlock the next for two weeks. It’s entirely up to you.

Start from Scratch
Build your campaign from scratch. Choose your trigger event, set unlock intervals or enable custom unlock conditions for all of the content in your course

Start from Scratch Drip Options
Use Case: You need to specify specific delays between lessons or modules that aren’t the same every time
Although it sounds like this gives you more a lot more options, what you’ll find is that as soon as you start choosing a trigger and schedule for unlocks you’ve quickly moved into one of the previously mentioned drip types.
For example, you can choose “when a user purchases a product” and “systematically” and you’re in Evergreen Repeating.
One unique format that you can build here that may see a lot of use is “when a user purchases a product” and to unlock content “at custom intervals”. This would be like an evergreen drip but at specific intervals unique to every lesson or module. You can specify the number of hours/days/weeks/months at each lesson or module. It’s really granular.
Most people won’t need to start from scratch, though, so there’s no reason to feel overwhelmed.

Thrive Automator Unlock
Build your campaign from scratch. Choose your trigger event, set unlock intervals or enable custom unlock conditions for all of the content in your course
Use Case: You need something not listed above!
The Thrive product team was smart. They realized there are fringe cases that don’t fall neatly within the options I’ve outlined above, and that some users will have very obscure and uncommon methods for wanting to unlock content in a course. For this, they’re turning to the newer Thrive Automator.
Unlocking content triggered by Thrive Automator allows you to trigger drip unlock through webhooks, autoresponder tags, and pretty much anything that can be triggered inside of Thrive Automator.
When you choose to use Thrive Automator, everything will be locked until you define a way it is unlocked by Automator.
This feature is still in development, but once it’s fully available I will have complete tutorials with examples and use cases for you.
Multiple Drip Campaigns for a Single Course

Each course can have as many drip campaigns as you need. Drip campaigns are just a timeline you’ve created with rules for unlocking the content in the course, but in order for them to be active for a user they must be assigned to a Product.
When a user gets access to the product, they become subject to the drip campaign rules.
Example reasons for why you may want multiple drip campaigns for a course course:
- Live launches that let you bring in a new wave of students but use the same course. You can create a product for each live launch and make users who purchase that particular live launch be subject to those specific dates, while past live launch students have full access.
- Time-gating content based on how long someone has been a member or how many payments they’ve made. Some course owners wish to limit someone’s access until they’ve paid in full.

Conflicting Drip Campaigns: What happens if they overlap across products?
If a course is included in different products, and those products reference conflicting drip campaigns, a user with access to both products will be bound to the drip campaign for the product that is highest on the list of products.
Take care to avoid drip overlaps when creating your products, but if they are unavoidable then realize that the product highest on the list will become the dominant product for drip campaigns.
Specifying Unlock Conditions at the Lesson Level
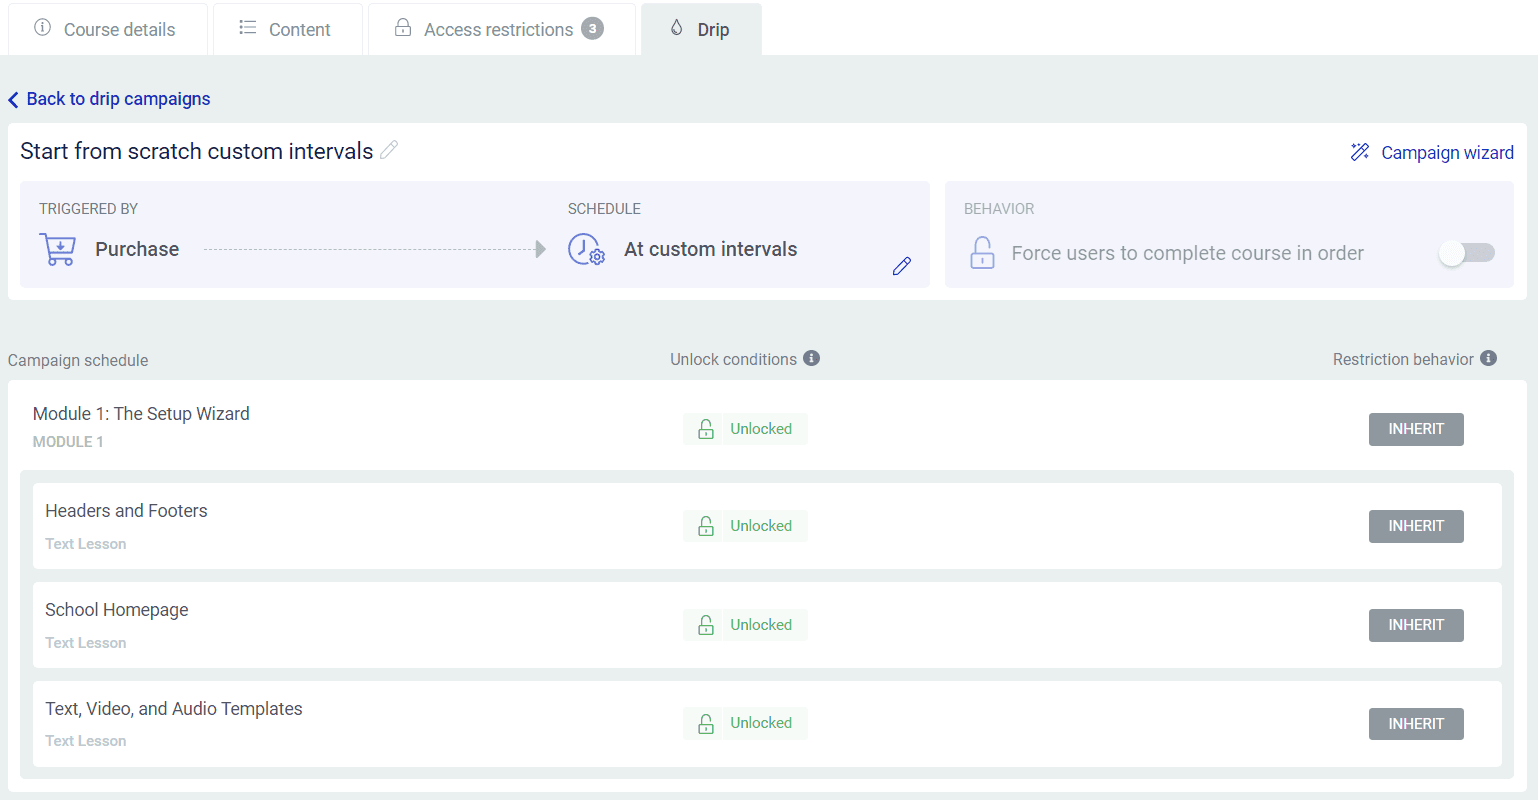
Some of the drip templates or drip options you can set in a campaign require you to view the campaign schedule and adjust the unlock conditions manually.
Clicking on the unlock condition allows you to apply further conditions based on our trigger.
If your trigger was a specific date and time, then the unlock conditions can be set to “time after…” in the form of hours, days, weeks, and months. This means that after your initial specific date trigger, the lesson you apply the condition to will unlock that amount of time after the specific time.
If your trigger was purchasing the product, then you can specify specific dates/times as as well intervals of time.
You can also choose whether to apply the unlock condition as an “any” or “all” condition.
Inheriting Unlock Conditions from Modules

If you assign an unlock condition to a module, such as a period of time that the module will unlock after the initial trigger (buying a course or a set date, for example), then each lesson inside the module will inherit that as a base condition.
Leaving each lesson as inherited means that the lessons will unlock when the parent module unlocks.
Applying a specific condition to a lesson inside the module will require the condition of the module to be met first, and then add the condition to it.
Applying Drip Campaigns to Products

The last step is to visit the Products tab where you can add your course to a Product.
Inside of the Product you’ll find a section on the left called “Drip” where you can assign a drip feed schedule.
My overview and walkthrough of Thrive Apprentice Products.
That’s it! Now you can choose how to sell your product (I recommend ThriveCart) which will then give access to the product and trigger the drip campaign for your student.

