This is a complete walkthrough for how to set up Amazon SES with FluentCRM. This tutorial is also applicable to Thrive Apprentice, Fluent SMTP, and other WordPress systems that can use Amazon SES.
Create an Amazon AWS Account
Visit aws.amazon.com/ses and click on the orange button in the top right to Create and AWS Account. Choose your email and password for your Root user. Once your email is verified, you can log in.
Select Root User and enter your Root user email address you created. Click Next and enter your password and complete the login process.
Select the Region for Your SES Setup
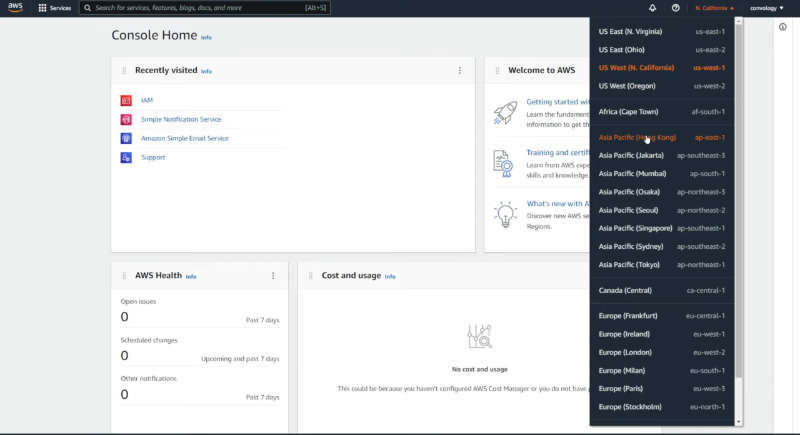
In the top right corner you can drop down the location selection and choose a region of the world closest to you and/or your users. I use US East (N. Virginia) for my Amazon SES setup, but I am located in California. So you do not need to be extremely close, just relatively accurate for where you are located or where you want your setup to reside.
Create IAM User Credentials
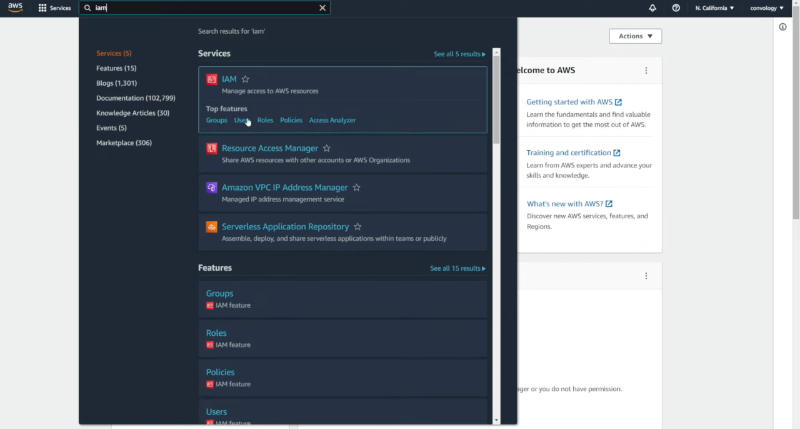
In the search bar at the top type in IAM and hover over it and select Users.
In the top right click Add Users.
Give your user a username and check Access key – Programmatic access
Click Next Permissions.
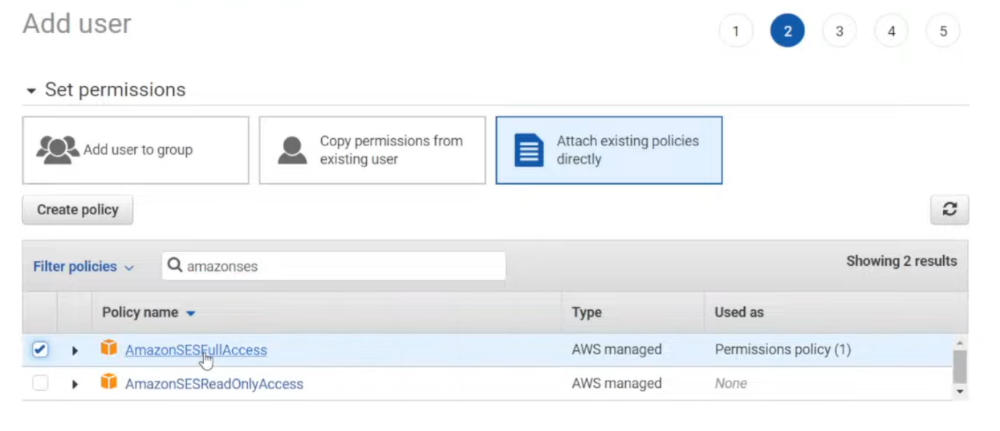
Select Attach existing policies directly and in the search bar for filter policies type in amazon ses.
Check the box next to AmazonSESFullAccess.
Click Next: Tags
Click Next: Review
Click Create user
Copy Your Access key ID and Secret Access Key
You need to save your access key id and secret access key to a safe place you can access in the future. We will need these later in our tutorial and you may need them later if you want to connect other applications to Amazon SES.
The secret access key can only be shown here on this screen. If you do not copy it now, you will need to create a new access key.
I recommend storing this in your password manager alongside your AmazonSES Root User login credentials.
Create Amazon SES Identity
In the top search bar type in Amazon SES and click on Amazon Simple Email Service.
Click Create identity button.
I recommend you choose Domain. This will allow you to send from any emails at your domain instead of just one email address.
Where it says Domain, enter your domain name.
Scroll down, leaving everything as it is by default, and click Create Identify.
Verifying Your Domain
We need to verify that we own the domain we entered in. Scroll down on this screen and in the Authentication tab (should be open by default) you will see DomainKeys Identified Mail (DKIM).
Your status will say Pending. We want this to turn green with a checkmark, so we need to enter in three DNS Records for our domain in order to authenticate in..
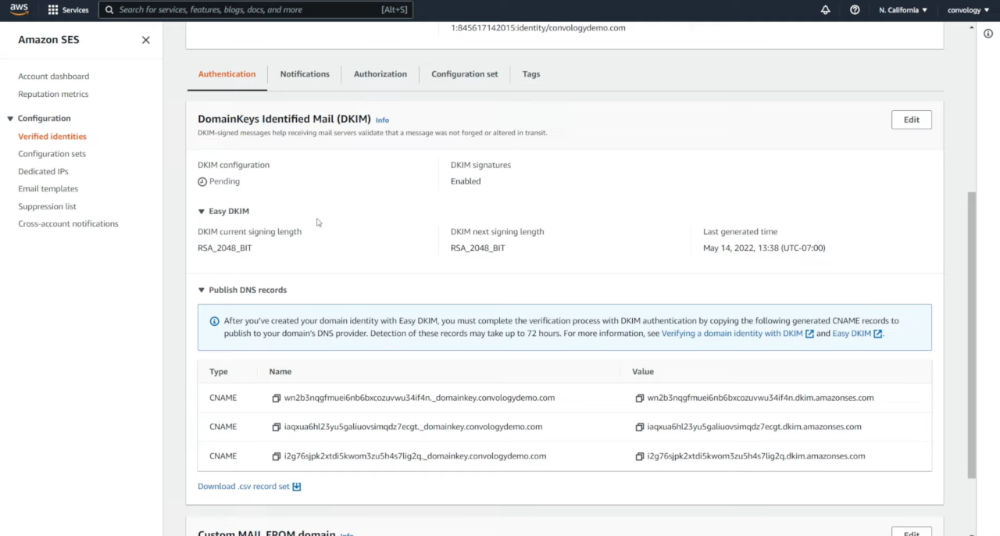
Go to your Domain Name Registrar or where your DNS are managed and pointing to. This may be Cloudflare, or Google Domains, etc. For our example, I am going to show you how it’s set up in Google Domains.
Copy the first Name by clicking the copy icon.
At your DNS (Google Domains, Cloudflare, etc), create a new custom record.
For the Type, select CNAME.
For the Host Name (or Name) paste in what we copied from Amazon SES.
Return to Amazon SES and copy the Value to the right of the Name you previously copied..
Paste the Value into the Data or Value box. Each DNS may refer to this slightly different.
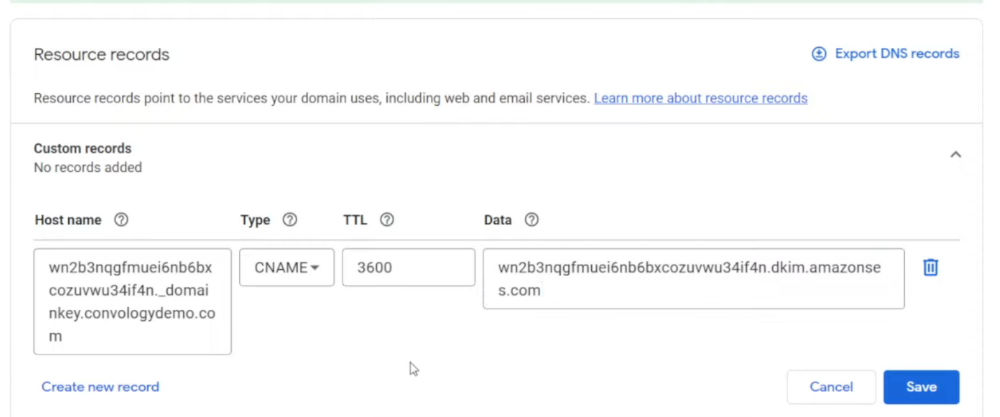
The TTL can be left alone or changed. The lower the number, the faster this will update. Some DNS services restrict how low this can be set. I find 3600 is fine.
Click Save.
Important Note
Some DNS services do not want you to have your domain name at the end of the Name value we copied and pasted into the Host Name or Name field. If your domain is not verifying with Amazon SES, or your DNS provider tells you there is an issue with what you pasted in, remove everything after _domainkey so that the .yourdommain.com is removed (including the period before it).
Repeat this process for all three records Amazon SES provides.
Optional Step: Use a custom MAIL FROM domain
Configuring a custom MAIL FROM domain will align your mail from address with the From address. This setting is required to be DMARC compliant.
To set this up, you can scroll down under the same Authentication tab we found our DKIM settings in.
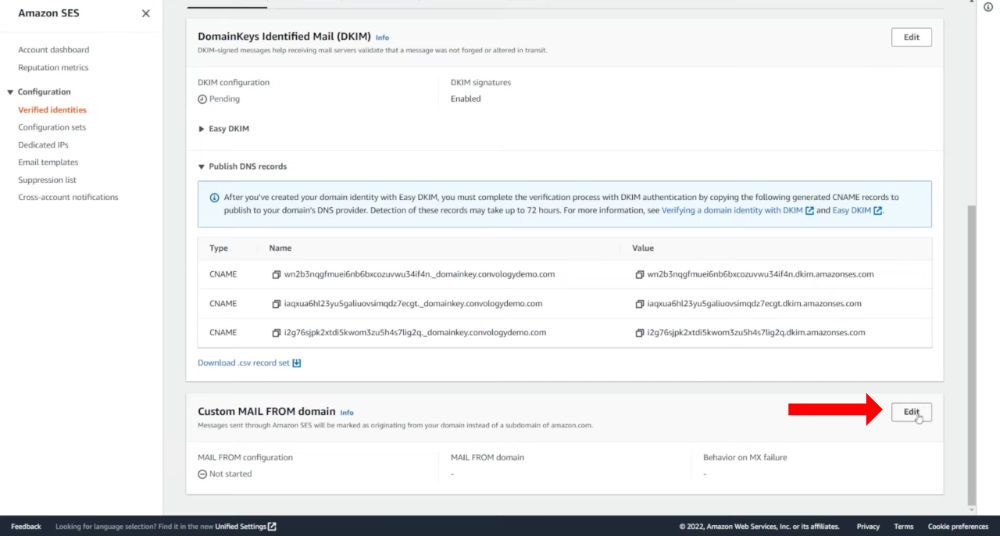
Scroll down to find the Custom MAIL FROM domain. Click Edit.
Check Use a custom MAIL FROM domain.
Enter in a subdomain to your verified domain such as emails.yourdomain.com. Click Save changes.
Scroll down and you’ll find two more records. These records need to be added to your DNS using teh same process as our CNAMEs. The only difference here is that the Type are MX and TXT. Also note, depending on your DNS provider, you may not need to append the .yourdomain.com (including the first period) in the Name record.
Your Custom MAIL FROM domain will also take time to verify depending on the TTL you set in the DNS records.
What happens if you do not set up a custom MAIL FROM domain?
Your mail will appear as sent by Amazon SES or “mailed by” Amazon SES. To the user it will still come from your email address, but to the email system they’ll interpret it as mailed by Amazon SES. In Gmail, you may even see a little notice that says via amazonses.com as seen below. I have used SES for over a year without a custom mail from domain. The choice is up to you whether you want to be DMARC compliant, which, in some cases, may improve deliverability.

Create Notifications in SNS
Navigate to the Notifications tab in the Verified Identities section (one tab over from Authentication where we have been working thus far).
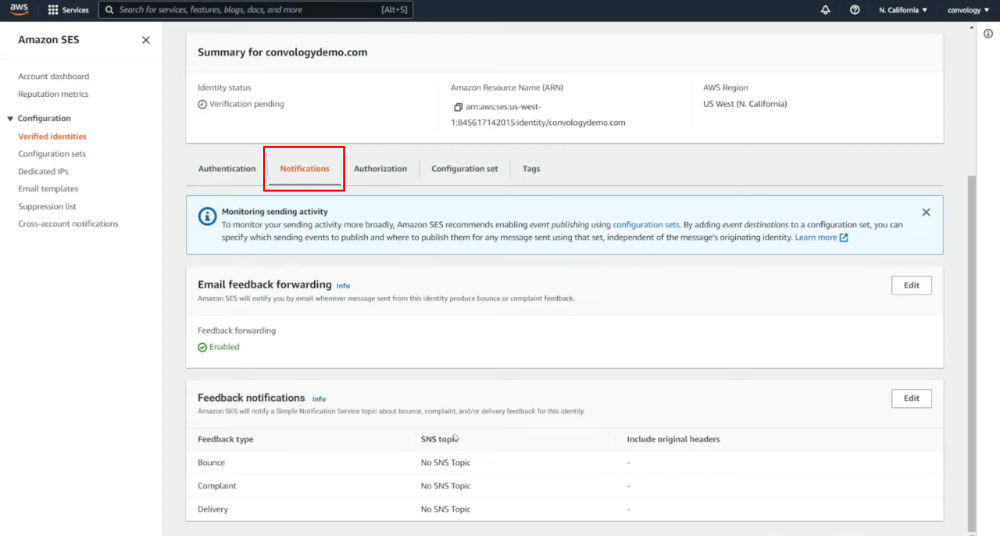
By default, email feedback forwarding should be enabled. This means that when an email bounces, or there is complaint feedback, it will be sent to your email address.
If you are using FluentCRM or a WordPress service that includes Bounce Handling and Complaint Feedback, you will need to set up a Feedback notification
In the top search bar, search for SNS and click on it.
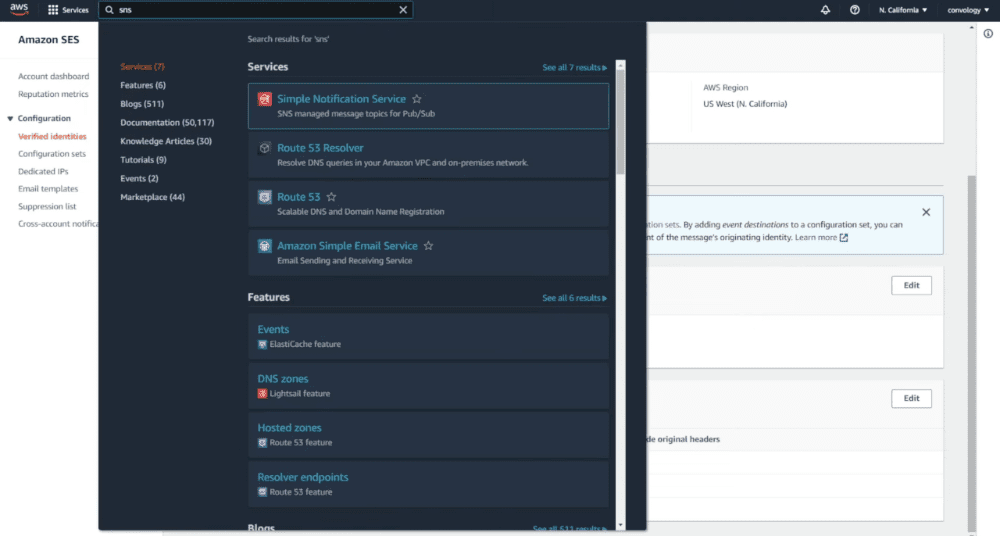
Create a topic by typing in a name for the topic. This can be descriptive of the notification you’re setting up such as “convologydemobounces”.
Click Next step.
Leave Standard as the option chosen. Click Create topic.
Click Create subscription.
For our protocol, choose HTTPS.
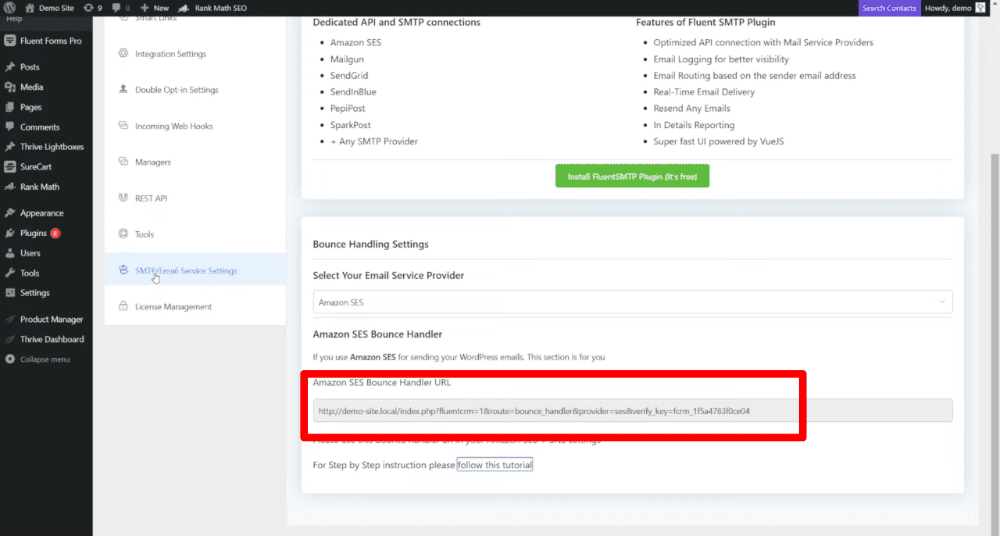
For Endpoint you need to go into FluentCRM and go to Settings > SMTP/Email Service Settings > Select your email service provider as Amazon SES > Copy the Amazon SES Bounce Handler URL. Paste this into the Endpoint field.
Check the box for Enable raw message delivery.
Click Create Subscription.
If your subscription worked you will see it listed on the next screen with a status of Confirmed.
Now return to Amazon SES by searching for SES and clicking on it.
Click on your domain listed here.
Click on Notifications tab.
In the Feedback notifications section click Edit.
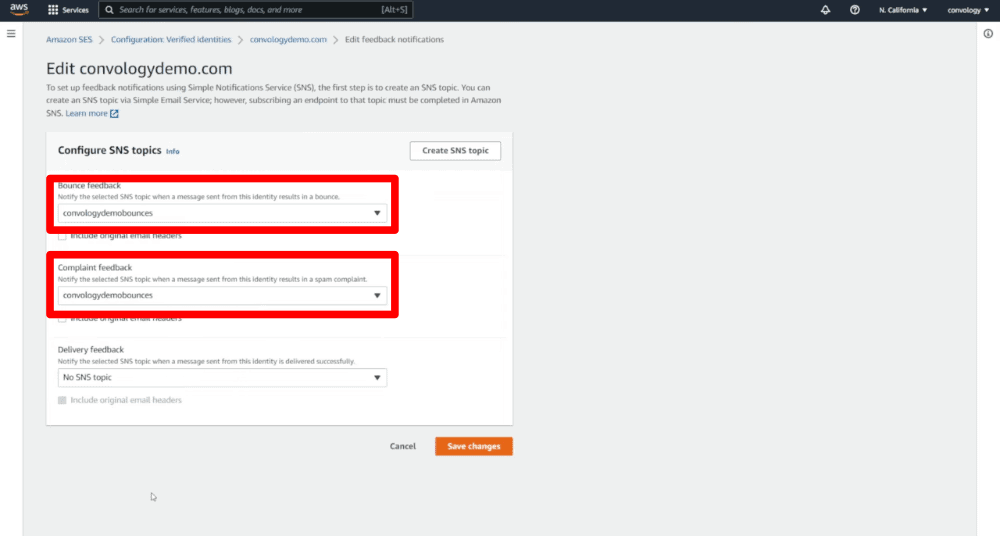
Under Bounce feedback select the topic you just created. Then do the same thing for Complaint feedback. Click Save changes.
Connect Amazon SES with Fluent SMTP
At this point we can now go to our website to enter in our access and secret keys. Inside of Fluent SMTP we need to Add connection and select Amazon SES.
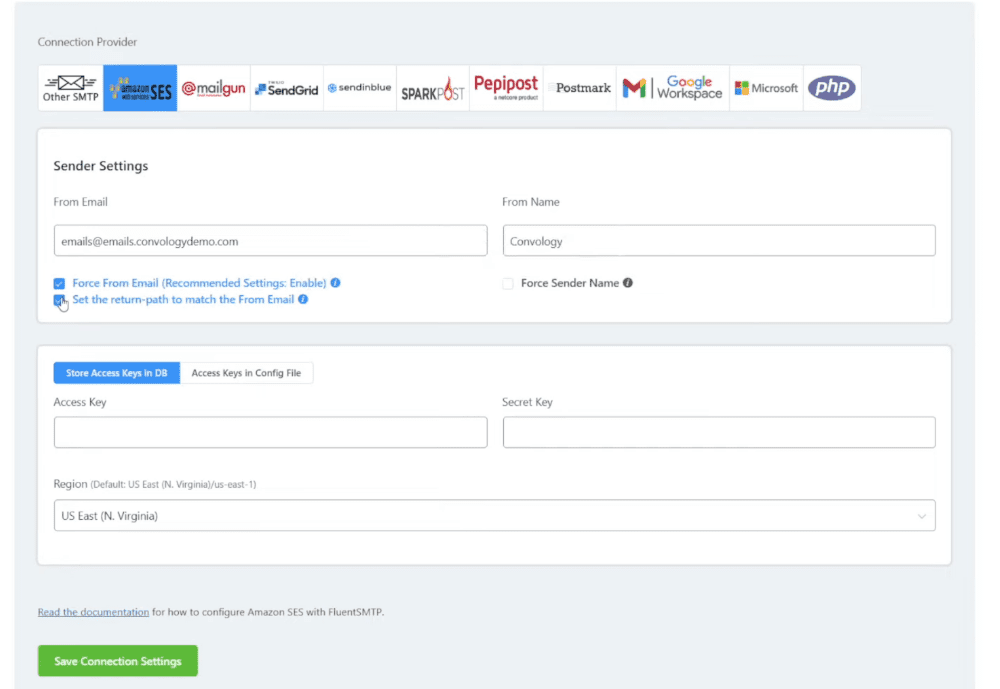
Here we enter our email from the domain name that we already verified. This could be [email protected] or if we went through the process of setting on a MAIL FROM subdomain, it may be something like [email protected].
Enter the from name that you would like to appear on your emails.
Next you need to paste in your Access Key and Secret Key that you kept in a safe place.
Select the same region you chose for your Amazon SES account.
Click Save Connection Settings.
Not Familiar with Fluent SMTP? Check Out My Overview.
Fluent SMTP is a FREE plugin that enhances the sendability and deliverability of emails from your website. It’s also how we connect Amazon SES to our WordPress website.
I use this even if I don’t use FluentCRM because it’s the best WordPress SMTP plugin available, and it’s also completely free.
Request Production Access to Amazon SES
At this point you are still in what amazon calls the Sandbox which means you have not been approved to use Amazon SES and you will have to request production access in order to send emails to anyone but yourself.
When you’re ready to apply to get out of the sandbox, let’s look at that process.
Back in your Amazon SES account in your dashboard you will see a notice about being in the sandbox. Click the Request Production Access button.
Here you will find the form you must fill out in order to be approved.
Tips for Getting Approved for Production Access
A real person is going to review your request for production access. This step is crucial and you can’t skimp on your request. You need to write a nice message and be very detailed about what you’re going to do with Amazon SES. Here are a few tips:
- Describe in detail how people are added to your email list.
- Describe in detail the types of emails that you send.
- Explain how you handle bounces and complaints.
- Clearly explain how your website is set up to handle emails and what tools you’re using.
- Link to examples of opt-ins.
- Create a website that doesn’t look spammy, and don’t sound spammy in your request for production access.
DONE-FOR-YOU
Amazon SES Production Access Template
I’ve used the same production access request template to successfully take dozens of Amazon SES accounts out of the sandbox. This done-for-you template includes:
- The Use Case Description
- Justification for Transactional AND Marketing Mail types
- How to tell them who you will be sending emails to based on users requesting emails
- Description for how you handle bounces and complaints
Just copy and paste and replace with your business details.
This template also includes personalized support directly from me to help you get unstuck and moving forward with Amazon SES in your business.
All of this is available to members of Convology Pro.
Even if you do all of the above, and even if you use my templates, nine out of ten times you are going to get a response back from a real person requesting that you provide answers to a few more questions. I believe this is just an additional way they really ensure that only those who truly want to be on the platform jump through these extra steps. It also filters probably filters out those who aren’t able to adequately provide legitimate answers.
Bottom line: They want people on their platform who have a legitimate and professional use for Amazon SES. If you aren’t able to prove that, you aren’t going to be approved.
I do offer one-on-one troubleshooting and coaching. If you’re interested in booking a session with me, we can get your Amazon SES set up in an hour. You can learn more about this service here.
Best of luck with your Amazon SES implementation, and enjoy your $0.10 / 1,000 emails sent!

