The best CDN for Thrive Suite is BunnyNet. It’s the easiest to use with the best caching plugin for Thrive Suite, costs practically nothing, and will speed up your Thrive Suite website so that you score better on the site tests and deliver a faster experience for your users wherever they’re located.
In this tutorial I walk you through the entire process of setting up BunnyNet using the two best caching plugins for Thrive Suite.
Step 1: Create a BunnyNet Account
Visit Convology.com/bunnynet to create an account and start your 14 Day Free Trial. You won’t have to pay anything for the first 14 days while you test things out and see the difference it makes on your site.
Step 2: Create a Pull Zone
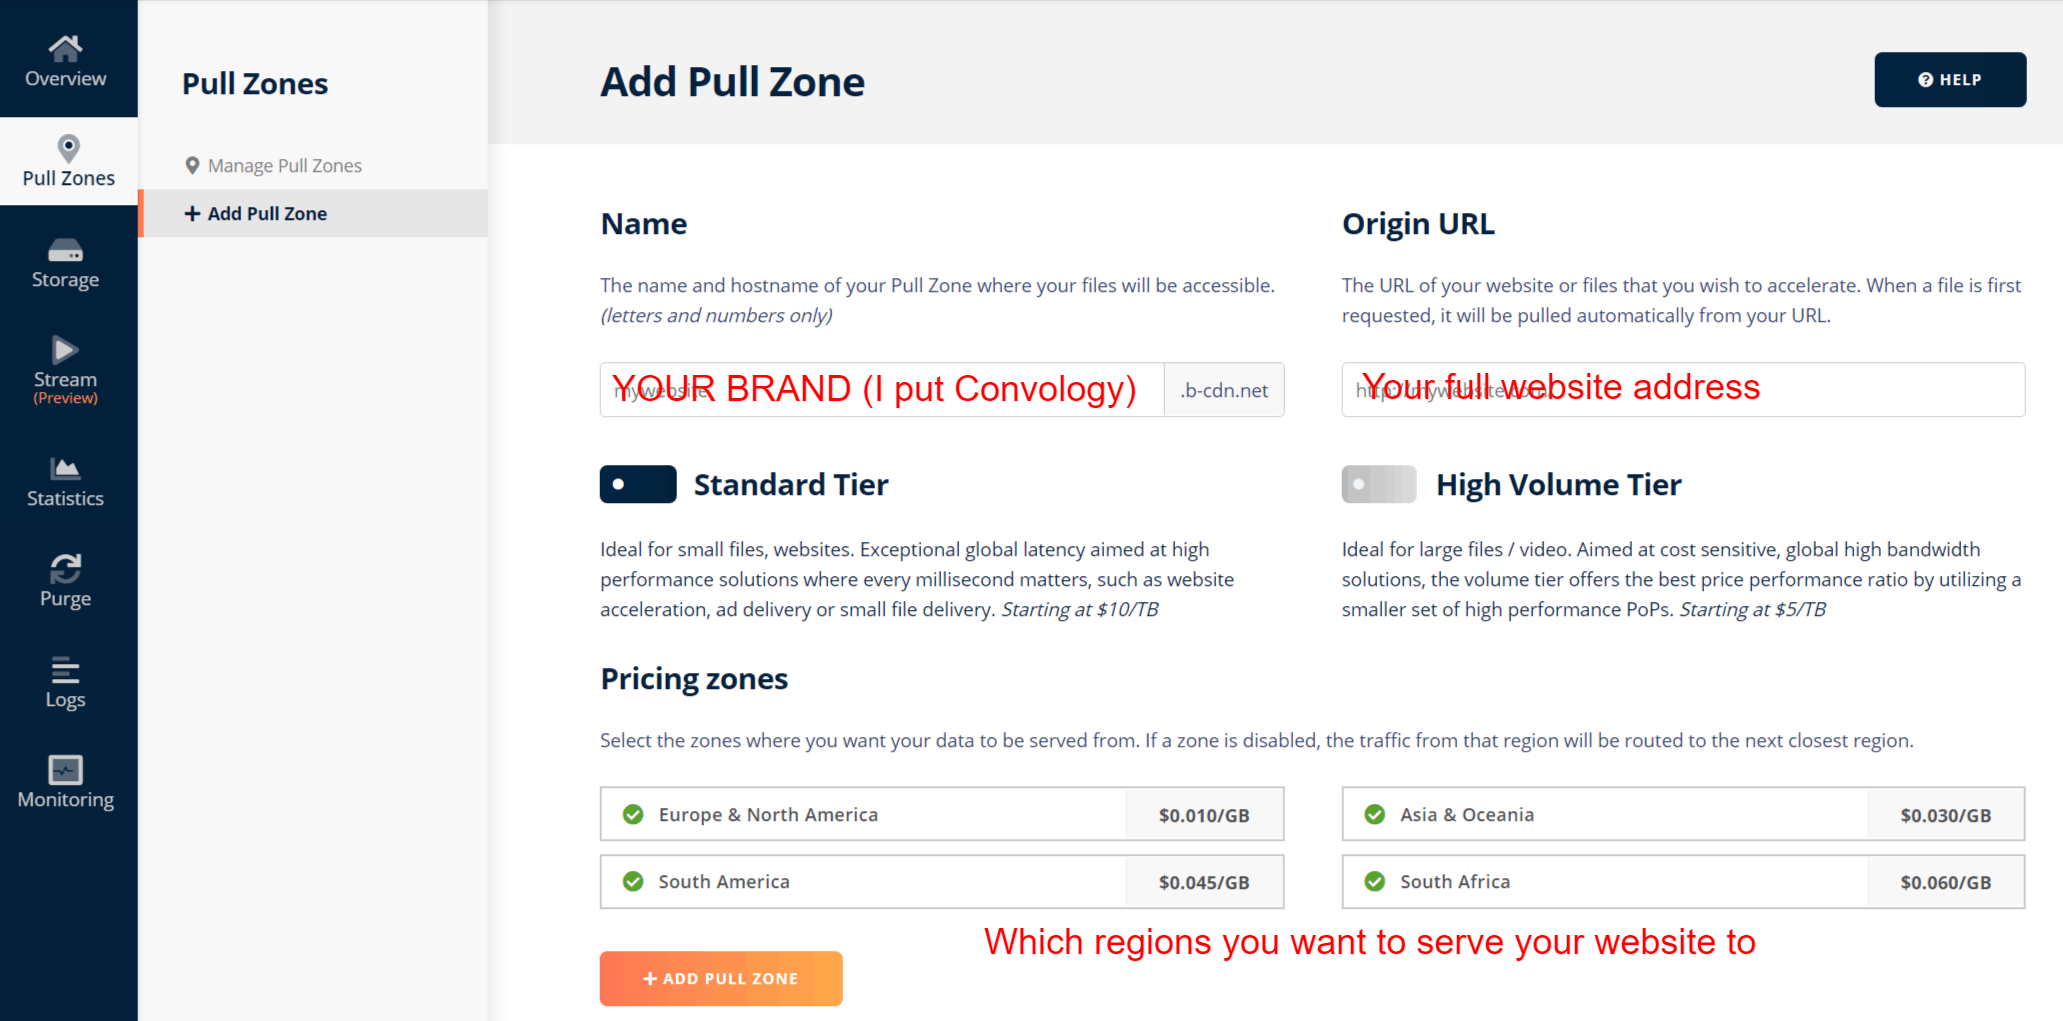
The next step is to create a Pull Zone.
In the name field I recommend you put something like your brand. If your site is convology.com then put convology.
In the origin URL, put your full website address including the https and www.

Configure Pricing Tier and Pricing Zones
Part of creating a Pull Zone is choosing your pricing options and pricing zones. I recommend you stick with the default and choose Standard Tier unless your website receives 100k+ visitors a month and you use a lot of video bandwidth to a global audience.
For the Pricing Zones, choose the areas of the world you want your website to load from. If you’re 100% only in North America and Europe then you can uncheck the others. I left all of these enabled because even if someone comes to my website from South Africa, they’ll practically cost me nothing. I would have to serve a gigabyte of data from South Africa in order to spend 6 cents.
Step 3: Adjust a Couple BunnyNet Settings
I recommend you make two easy adjustments to your BunnyNet settings. Select your Pull Zone and on the General tab you’ll see a toggle to Force SSL. Toggle this on.
Next, find Headers and enable Canonical headers. That’s it! Nothing else to tweak in BunnyNet.
Step 4: Connect BunnyNet to your Caching Plugin
The easiest way to configure your new BunnyNet CDN to work with your website is by using a caching plugin that directly supports a CDN. I recommend two free options:
- Breeze – If you’re with Cloudways, this is their in-house caching plugin. Setup requires no effort on your part, and connecting the CDN takes less than 10 seconds. If you can cut and paste a web address, you can connect it.
- W3 Total Cache – Completely free choice that works with just about any other host.
For details on how to connect Breeze and W3 Total Cache to both of these plugins, view the video at the top of this tutorial and check out my guide on using the best caching plugin for Thrive Suite.
Step 5: Experience a Faster Website
Your CDN is now active and you will see that over time more of your site is added to the CDN. Within a few days, you’ll be serving visitors from your Pricing Zones and your site will load almost instantaneously for them.
How Much Does BunnyNet Cost?
BunnyNet’s costs are very transparent. You’re billed for what you use, and a minimum of $1/month. They require an initial $10 balance to fund the account. If you’re like me and have about 6-10 sites on the CDN with video hosting and a decent amount of traffic, you won’t break that $1 minimum and your $10 initial balance will last you 10 months. That means BunnyNet will cost you, at most, $12 a year.
Considering BunnyNet is way more than just a CDN and allows you to host files, videos, and more for ridiculously low prices, that $12/year ends up saving me over $300/year. Save $288/year? Uh, yeah.
BONUS: Use BunnyNet for Video Hosting
If you’re using videos with your Thrive Apprentice courses, you can use the same BunnyNet account to store and stream your videos for mere pennies! Compare that with the cost of Vimeo which costs HUNDREDS of dollars a year… and it’s a no brainer.
I have a complete tutorial on how to make this all happen using Presto Player which is the best video player for Thrive Apprentice.

