One of my favorite things about SureCart is the Customer Dashboard experience. It’s so nice to have a place where customers can access everything about their order all in one place.
I’m using the SureCart dashboard for my membership and course sales. My students can access their membership, upgrades/downgrade, and even get their own receipts.
Using the dashboard with Thrive Suite requires a few steps in order to avoid breaking the dashboard because it’s built using the WordPress Block Editor.
in this tutorial I’ll walk you through everything you need to know to get your customer dashboard up and running on your Thrive Suite site.
Watch the Video Version for How to Build a SureCart Customer Dashboard in Thrive Suite
Create or Edit the SureCart Dashboard
SureCart creates a page for you and labels it as the “Customer Dashboard”. You’ll find this page in the normal WordPress page area. You’ll see the ” – Customer Dashboard” designation on it. Don’t ever delete this page.
Edit this page using the WordPress editor.
Once editing the page you will see a SureCart dashboard filled with demo data. This is built using the Gutenberg/Block Builder. While not my favorite tool (I actually dislike it a lot), SureCart has done a decent job giving a framework to add their blocks into which makes the process less painful.
Open List View
To the left of the Launch Thrive Architect button you’ll see three lines vertically stacked and slightly offset from each other. This button enables List View (you can also press Shift + Alt + O). List View provides a way of seeing the block hierarchy and allows you to select blocks specifically in a much easier way than interacting with them directly.
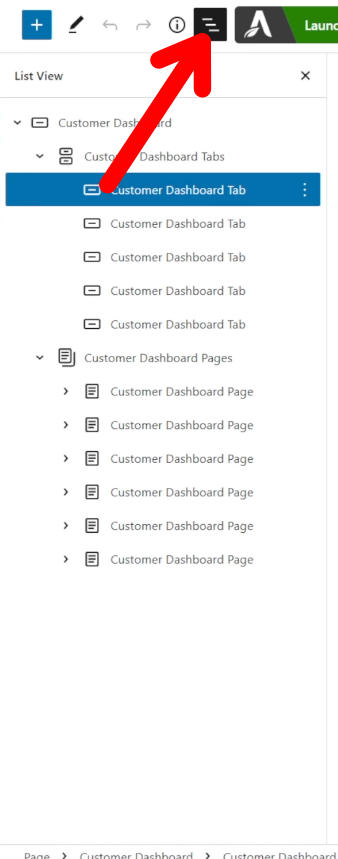
Customer Dashboard tabs
By default the dashboard has tabs on the left. You can add new tabs by clicking the plus symbol at the bottom of the tabs.
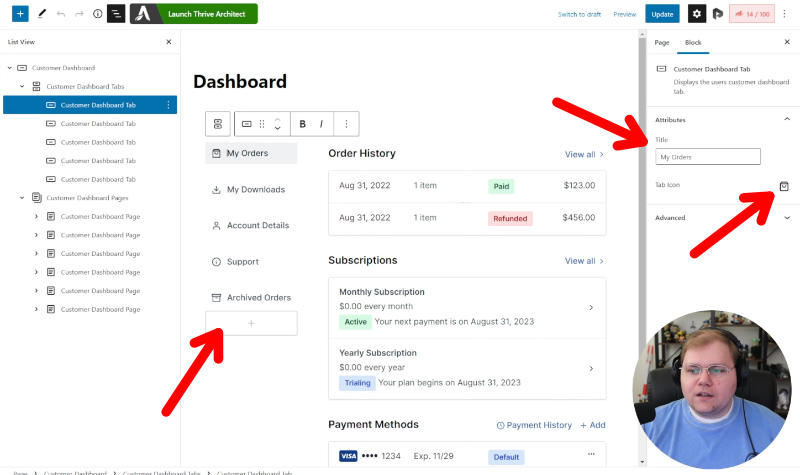
Each tab can be edited by selecting the tab. Once a single tab is selected you’ll see on the right the ability to change the “Title” of the tab and the Icon.
You can reorder the tabs by clicking and dragging them or using the little arrows. I like to use the arrows because it’s quick and harder to mess things up.
Add New Blocks Into the Dashboard
To add content into a tab, select the tab. Now the central or main area of the dashboard will be empty with a plain box inside and a plus symbol. Clicking this will open the quick view of the blocks. Click browse all.
On the left you’ll see the blocks available and you can scroll down to find the SureCart blocks. These are the only blocks that I recommend you use. I’ve found that adding non-SureCart blocks into the dashboard will break the dashboard.
By default, SureCart has given you a good dashboard. I edited mine to move the downloads into their own tab that I named “My Downloads”. I then took the Customer Downloads block and placed it into my new My Downloads tab.
Create Your Dashboard’s Page Using Thrive Suite
Once you have your dashboard how you like it, it’s time to add it to your site. In this tutorial we’re going to look at how to do this with Thrive Suite.
We can’t simply open this dashboard page in Thrive Architect. Doing so would wreck the WordPress Block editor, and the whole thing would be messed up and broken. Then you’d have to restart the whole process of building your dashboard over again… this time completely from scratch. This aspect of SureCart needs some work.
So how do we safely edit this page, then? We’re going to make a template in Theme Builder.
Create a Custom Template in Thrive Theme Builder
Head over to Thrive Theme Builder and go to Templates. Duplicate your default page template as a starting point, or go to the Core Templates at the top and go to your Page Templates section. Either way, create a new Page Template.
Hover over the template and click Edit.
Once editing the template you will see a section called “Post Content”. This is where all of the content you add to a page will go. It’s also where all of the default content already assigned to a page using this template will go, meaning our default block editor dashboard from SureCart will go right here.
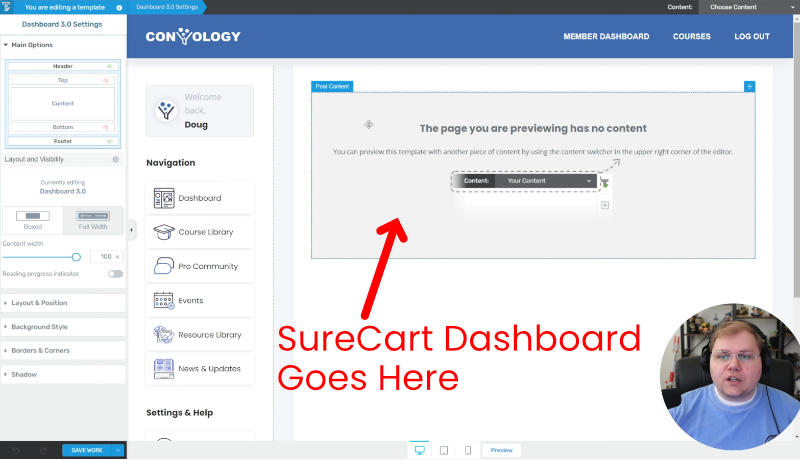
You can click and drag the Content Area wherever you want. For example, I have mine in a column in a content box.
Assign Your SureCart Dashboard to the New Theme Builder Page Template
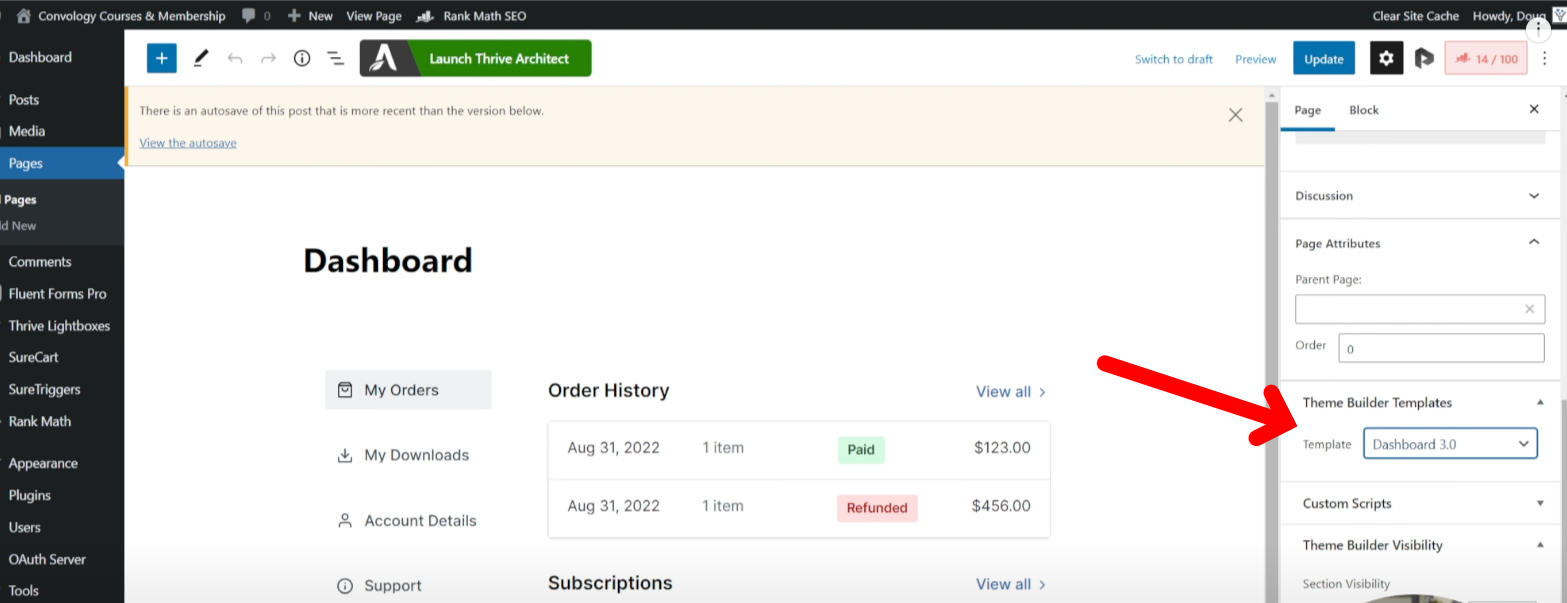
Back inside of the default page editor where we customized our dashboard using the Block Editor, you’ll want to find the Theme Builder Templates area in the right sidebar. Use the dropdown to select the template you just built. I named mine “Dashboard 3.0”.
Where to Get Additional SureCart and Thrive Suite Support
In Convology Pro we have an entire community of digital entrepreneurs using the latest tech and tools to build and grow their businesses (myself included!). That includes SureCart and Thrive Suite. If you’re looking to get started with SureCart or integrate it into your setup, check out Convology Pro.

