If you’re looking to offer free courses through Thrive Apprentice, you’re going to want to provide your users with a nice registration form. The default registration form with Thrive Apprentice isn’t ugly, but it leaves a lot to be desired for customization.
Let’s take a look at how we can accomplish this using only Thrive Architect.
Step 1: Create a New Page
I recommend you create a separate page dedicated to the user registration form. This will allow you to choose this page as your default account registration page within Thrive Apprentice. I typically call mine Registration or Course Registration.
Step 2: Add the Lead Generation element from Thrive Architect.
Next you add the Lead Generation element to your page wherever you’d like the form to appear. Customization is key, so feel free to design the page as much as you’d like.
Step 3: Connect the Lead Generation Element to WordPress
Under the “Main Options” section you will find the “Add Connection” button. Click this and choose ‘Go to the API Dashboard’. Here you will add a connection and search for “WordPress” and choose WordPress Account.
This connection tells the Lead Generation element to add an account for this user directly into WordPress.
Within the Lead Generation element, you also want to choose where to redirect the user upon completion. I recommend setting the custom destination URL as your Thrive Apprentice course index.
Pro Tip: You can add multiple connections! Want your users registering for accounts to go into your email marketing tool? Simply add another connection! Now you can send even free users your email marketing automation sequences without having to use any other tools. How cool is that?
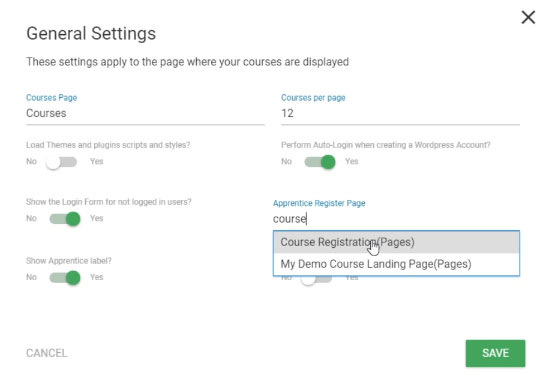
Step 4: Set Your Default Registration Page in Thrive Apprentice
In Thrive Apprentice, go to the General Settings and customize the “Apprentice Register Page” option so that it links to your new registration page you just created. Click save.

Step 5: Set the Access Restrictions in Your Free Course for WordPress Users
Go into the course you’d like to offer only to logged in / registered users and set an access restriction as “Give access if user has any of the following WordPress user roles: Subscriber”.
This it! Now your users will see your beautiful custom account registration page when they try to access your course. You can redirect them to the
BONUS Tip: Looking to provide your users with an equally beautiful and customized experience when they return and try to log in to your website? Check out my tutorial on how to create a custom log in form for WordPress.

