Segmenting is an easy and efficient way to email market to your audience. Sending the right message to the right people will not only convert better, which is great for you, but it will better help the people you’re trying to serve too.
FluentCRM has a built-in integration with Fluent Forms (built by the same developer) that allows you to tag someone based on what they filled out when submitting a form. They call this feature Dynamic Tagging.
In this tutorial we’ll use an example scenario where Dynamic Tagging would be really useful: Polling your audience to find out which blog posts were their favorite this year.
Pre-Setup To-Dos in FluentCRM
Before you start building your form and segmenting your users, you’ll want to first make sure that you have tags set up in FluentCRM for the segments you want to use.
In our example, we’re going to ask people which blog posts were their favorite this year. This is going to be how we segment our users based on their selection.
I’m going to create tags for each of the following topics, so that I can tag users who fill out my form and send them future emails about these topics:
- Thrive Apprentice
- Circle
- ThriveCart
- ConvertBox
- FluentCRM
Once my tags are created, it’s time to go into Fluent Forms.
Building a Fluent Form for Dynamic Tagging & Pre-Fill
Creating a form is very simple in Fluent Forms. The interface is really response, intuitive, and options aren’t buried beneath too many unnecessary stops or clicks.
In our example we’re polling out users so I went ahead and used a text field for their first name and an email field so that we can learn just a little bit about them. For our email list users, we’re going to pre-populate these fields to make it more convenient for them.
How to Pre-Fill or Pre-populate Fields in Fluent Forms
The easiest way to pre-fill a field is through URL parameters or query strings. You’ve probably seen them before in a url after the end of a link. They start with a question mark and look something like this: ?email=&first_name=
We’re going to set up those query strings later in this tutorial.
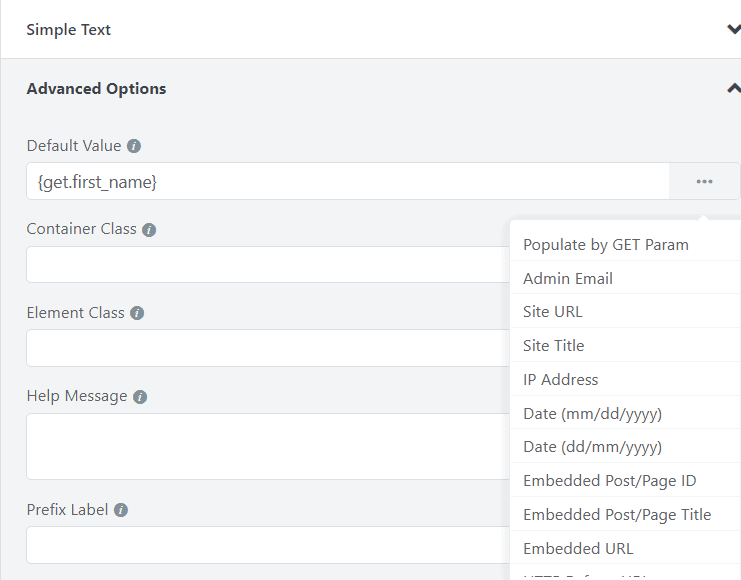
We can pull from the url parameters using the GET Params option. Click on the field you want to pre-fill and go to Advanced Options.

Find Default Value and click the three dots to the right.
Click ‘Populate by GET Param’.
Your Default Value will now show: {get.input_text}
We want to replace the “input_text” part of the tag above with the variable we’re going to pass from FluentCRM. In this case, for the first name we’ll put “first_name” and for the email we’ll put “email”. Both of these are without the quotes and should look like this:
{get.first_name}
{get.email}
Once the default value for both first name and email are set, we can move on to creating our segmenting fields.
Creating Form Fields for Segmenting in Fluent Forms
I recommend using the checkbox or radio fields because they allow your users to select options that you can pre-configure as tags.
Checkboxes make the most sense for our example of polling our users about their favorite blog posts because I want them to be able to choose multiple posts (and I can tag them with all of the ones they choose!).
All you have to do is create the fields, put in your options to be chosen, and you’re done with the form. The dynamic tagging options are in a different area.
How to Set Up Dynamic Tagging in Fluent Forms
To access the dynamic tag options, you need to first set up your Fluent CRM integration with this form. Go to Settings & Integrations at the top.
Find “Marketing & CRM Integrations” on the left menu.
Hover over “Add New Integration” and select “FluentCRM Integration”.
Give the integration whatever name you want. I leave mine as the default.
For the Email Address field, click on it and select the email field you made in your Fluent Form. Mine was conveniently named email. You can leave the rest blank because we’re only using the email address in order to identify existing contacts in FluentCRM.
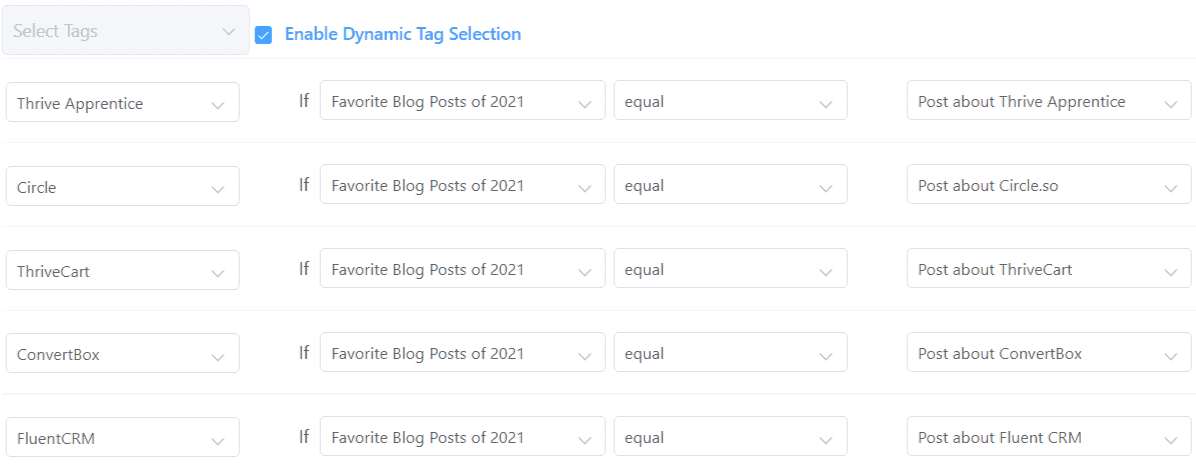
Scroll down and look for the checkbox that says “Enable Dynamic Tag Selection” and check it.

Now we’re going to tag our users based on the options they choose on our form. For our example, whichever checkboxes they check, we’re going to apply a different tag. These are the tags we previously set up in FluentCRM.
At the bottom save by clicking “Create FluentCRM Feed”.
How to Link to a Fluent Form and Pre-Fill Name and Email
Since we already set up our parameters in our Fluent Form, all we have to do is tell FluentCRM what information to send to those parameters.
When writing an email, such as a campaign, in FluentCRM you can press the “@” symbol on a new line of the email and it will bring up the merge tags that are used. Clicking on one, such as the email or first name, will show you the following tags that we must use:
{{contact.first_name}}
{{contact.email}}
Let’s create our link with our URL parameters / query string so that our Fluent Form can pull the info from it.
If I had embedded my Fluent Form in this blog post, here’s what my link would look like:
Let’s break it down.
After the URL we have the query string:
?first_name={{contact.first_name}}&email={{contact.email}}
Our querystring has parameters:
first_name
email
We’re dynamically populating the data of those parameters based on the information we have about the contact who clicks on them with our merge tags:
{{contact.first_name}}
{{contact.email}}
We use a ? to start the query string, and an & to separate each of our parameters.
When a user clicks on the link after receiving an email, their information will take the place of the merge tags and our Fluent Form, because we told it was to look for, will prefill that information.
Final Thoughts on Segmenting Users with Forms
Fluent Forms are a great tool for segmenting users. The use cases are varied, as well.
- Polling users (the example we used in this tutorial)
- Adding users to a newsletter (opt-in checkbox tags newsletter)
- Finding out how someone heard about you (if they chose Youtube, you’d know to tag them as interested in videos)
- What type of support someone is looking for (you know what they’re doing and can send them tutorials in the future)
If data can be chosen, users can self-segment, and if they can self-segment they can be tagged… and if they can be tagged, you now have the ability to reach them with information that will serve them best.
If you have any questions about FluentCRM, Fluent Forms, or segmenting your website/email users, I welcome your questions in the comments below or you can schedule a 1-on-1 coaching call with me for hands-on help.

