The team at Thrive Themes recently released an article showcasing the new custom HTML feature that allows us to trigger HTML code when a users views a particular state in a multi-state form. Their purpose was to teach how to Facebook Pixel leads from opt-ins, but I had another idea in mind. I wanted to trigger events for Google Analytics using Google Tag Manager, but only have those specific events fire when a user viewed a specific state in my Thrive Leads opt-in.
Unfortunately, the process proved far more difficult than I had imagined. I initially tried the Form Submission option, but for whatever reason that doesn’t trigger in Tag Manager for Thrive Leads. Ultimately, here’s how I got it to work.
How to Trigger Events in Tag Manager for Thrive Leads Opt-Ins
This guide will assume you have a Tag Manager account. If you need assistance with adding Google Analytics to Tag Manager, I will cover that in my video below as well.
Step 1: Create a Thrive Leads form with a Lead Generation element
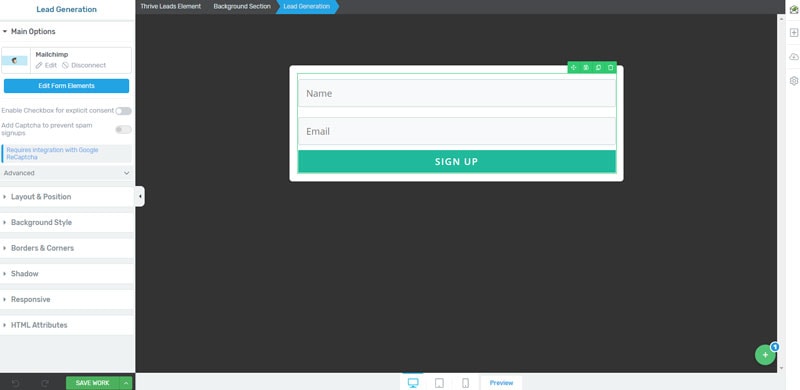
Adding a Lead Generation element within a Background Section inside my default state of a multi-state opt-in in Thrive Leads.
You can create any form element you like, but for the purposes of this tutorial we’re using multi-step opt-ins. I’m creating mine using a ThriveBox.
Step 2: Add a New State
Press the green plus icon in the bottom right and add a new state if you do not already have an available state in addition to the default state.
Step 3: Add an ID inside the HTML Attributes for the Background Section Element
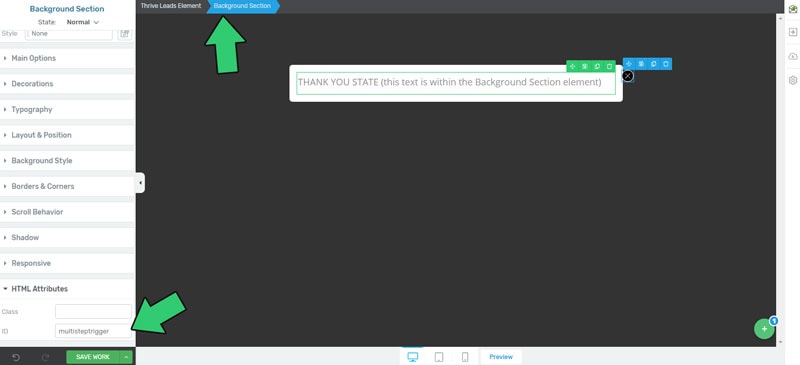
Adding an HTML ID to the Background Section within my “Thank You State” of my multi-step opt-in in Thrive Leads.
Within my Thrive Leads Element was, by default, a Background Section. Selecting that background section, scroll down on the left side (default location) and find the HTML Attributes section. Expand and locate ID. You can place whatever ID you want here, but this is what you will provide to Tag Manager. I gave mine the ID: “multisteptrigger” (without quotes).
Save this and return to your Default State.
Step 4: Connect Form to a Service
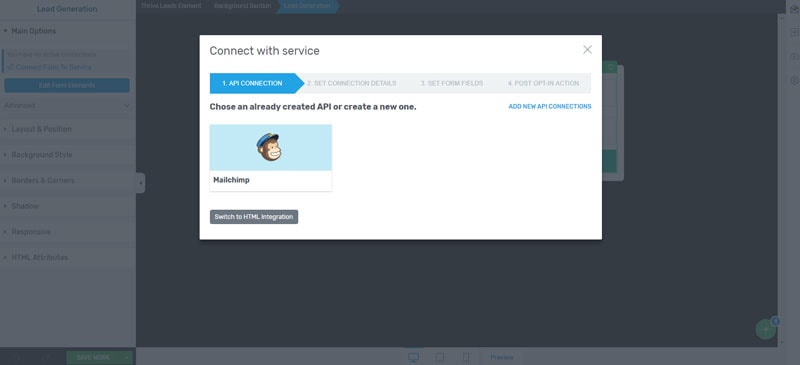
For this example, I connected my Lead Generation element to a Mailchimp API. You can choose any compatible API connection you like, as long as you have the option to determine your “Post Opt-In Action”.
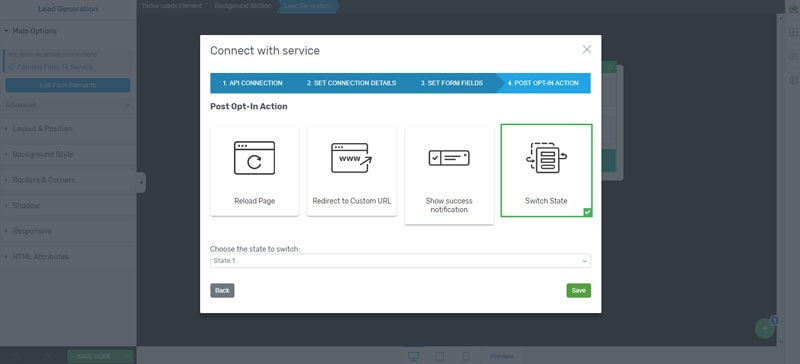
Set your post opt-in action to “Switch State” and choose the second state you created where you added the HTML ID. Save.
Step 5: Create a New Trigger in Tag Manager
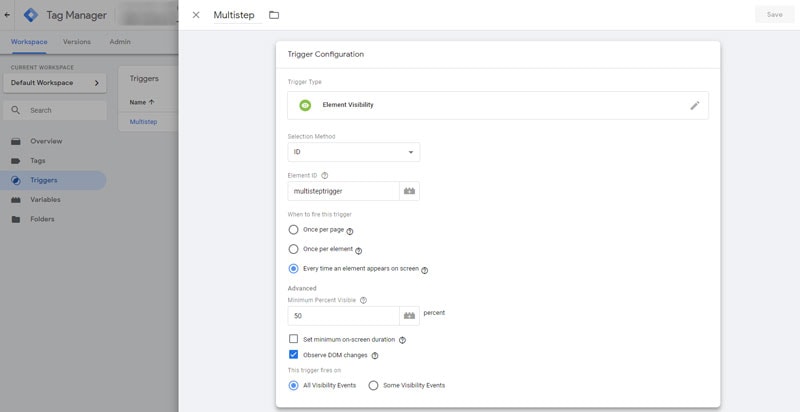
We are going to create a new trigger and use the Element Visibility trigger type. Name this trigger whatever you like. Here are the options for the Element Visibility trigger:
- Selection Method: ID
- Element ID: multisteptrigger (this is what you named you HTML ID in Step 3)
- When to fire this trigger: Every time an element appears on screen
- Minimum Percent Visible: 50
- Check Observe DOM changes
- This trigger fires on: All Visibility Events
Step 6: Create a Tag to fire the Element Visibility Trigger
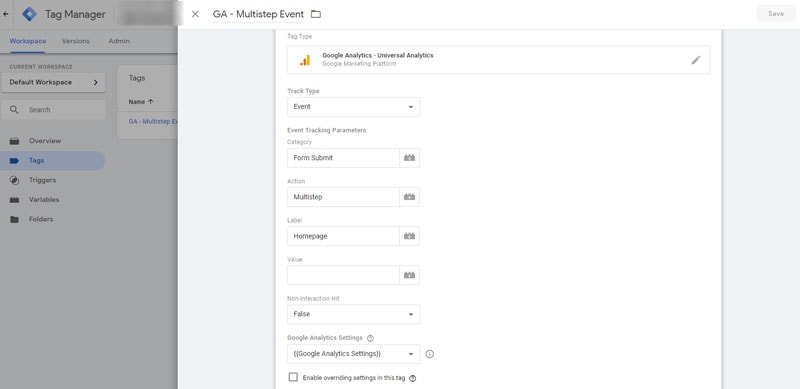
Next we will make a Tag. Choose the Google Analytics – Universal Analytics tag type. For Track Type we will choose Event because we want to send an event to Google Analytics whenever someone reaches our multi-step state we created.
Now we have to configure the event tracking parameters. These can be set to whatever you like. I typically set my Category to “Form Submit” because I want all of my form submissions to be categorized the same. Under “Action” I use Multistep so that I know which type of form was submitted. Lastly, my Label parameter is aptly named for the page where that opt-in is found.
Lastly, you’ll want to make sure you associate the Google Analytics property with your trigger. See the video for how to set this up earlier.
Step 7: Submit and Publish your Tag Manager Workspace and Test Google Analytics Event
Finishing up in Tag Manager you want to click ‘Submit’ and then ‘Publish’ within Tag Manager.
Let’s test the event you just created! Open up your Google Analytics and find the Real-Time Events report.

Fill out your opt-in we created in Steps 1-4 and press submit. You should have been redirected to your secondary State. Check Google Analytics now, and your event should appear within a few seconds!
That’s it! You have successfully created a Thrive Leads multi-step opt-in that will trigger an event and push that data in Google Analytics using Tag Manager.
Why is this useful? You probably already know if you’ve gone this far, but this type of tracking is essential when you want to provide an opt-in form on a page and not have the user be redirected to a thank-you page. These events can be set up within Google Analytics as Goal Completions, which means you’ll be able to get more granular with your data and develop some pretty amazing conversion funnels.
If you have any questions, please feel free to ask in the comments below. If you need a little more direct or hands-on help, check out my Thrive Leads help page.

