This tutorial is best in the video format that I have provided above. Below you will find further rationale for why you might follow this tutorial (or if you even need it) as well as a general overview of the process for connecting SureCart customer data with WordPress accounts automatically.
Key Takeaways:
- SureCart only makes a customer’s WordPress account on the site where the purchase took place
- SureCart customer data is synchronized across all of your websites but not linked to WordPress accounts automatically on sites where the purchase did not take place
- Using SureTriggers we can create accounts on secondary sites and update the WP meta key/values to link the WordPress and SureCart accounts together.
- Additional sites and platforms in your tech stack can be added into this automated workflow
The Website Setup and Reason that Requires Synchronizing Data
This tutorial applies to someone who is using SureCart to sell on one website and fulfill that purchase on another website. But not only that. Because SureCart’s magic login links would solve that no problem.
The key differentiator here is that you are wanting the WP account data to hit the site first before the user logs in and not after they log in for the first time (via a magic link).
By creating the WP account first we can apply access and use that account data to do things with Thrive Apprentice or LearnDash or whatever we want. But here’s the problem… the SureCart customer data doesn’t identify this manually made WP account. So if the user goes to the SureCart account page, they don’t see any of their invoices, subscriptions, etc.
Well, fear not. This tutorial solves that. But that’s the reason why and the setup for why this works. And it’s probably one of those tutorials where you only know you need it once you know you need it.
Here’s the setup outline:
Site 1 – Where the Sale Happens
- Selling happens here
- Customers add-to-cart here (Key Reason)
- Customer do not log in here
- Customers do not access account data here
Site 2 – Where the Customer Logs In
- WP account data needs to be created here and utilized prior to the user logging in (KEY)
- Customer logs in here
- Courses are here
- Videos are here
- Customer manages account data here
I want to highlight that you do not NEED this setup. You can avoid it altogether if you simply link from a landing page/sales page on your main site over to a checkout form on Site 2. It’s 100% easier to avoid using this process.
However, people like the “add to cart” experience and want to sell multiple products at once on their main site without pushing cold traffic to a subdomain. I get it. Makes sense.
Why would you use multiple websites in a setup like this?
Often the primary website is front-facing to the public and acts as a marketing and sales tool and isn’t where you want the customers to log in. Imagine if you were selling courses or a membership and you had hundreds of customers accessing your website and logging in to interact with their purchase. All of that tech and all of those dynamic database queries slow a site down. It’s unavoidable.
If the setup described above resembles what you want, and you like the idea of keeping your customers logging into a site that isn’t your primary domain, then read on.
Initial SureCart Setup
You want to make sure that whatever site the customers will be logging into is the main site on your SureCart account. The reason for this is to ensure that any emails sent to the customer lead the customer to the site where they will log in and NOT to any other site connected in this process.
You want to then install SureCart on each of your additional websites.
Install SureTriggers
You can download SureTriggers from the WordPress plugin repository.
Once installed, access it in your WordPress admin area and connect your website. When creating a SureTriggers account always use the same account you used when signing up for SureCart. This ensures that you get the SureTriggers pro plan connected properly if you purchased a SureCart Business plan or higher (Recommended).
I recommend connecting all of your websites to SureTriggers for this setup.
Creating the SureTriggers Workflow
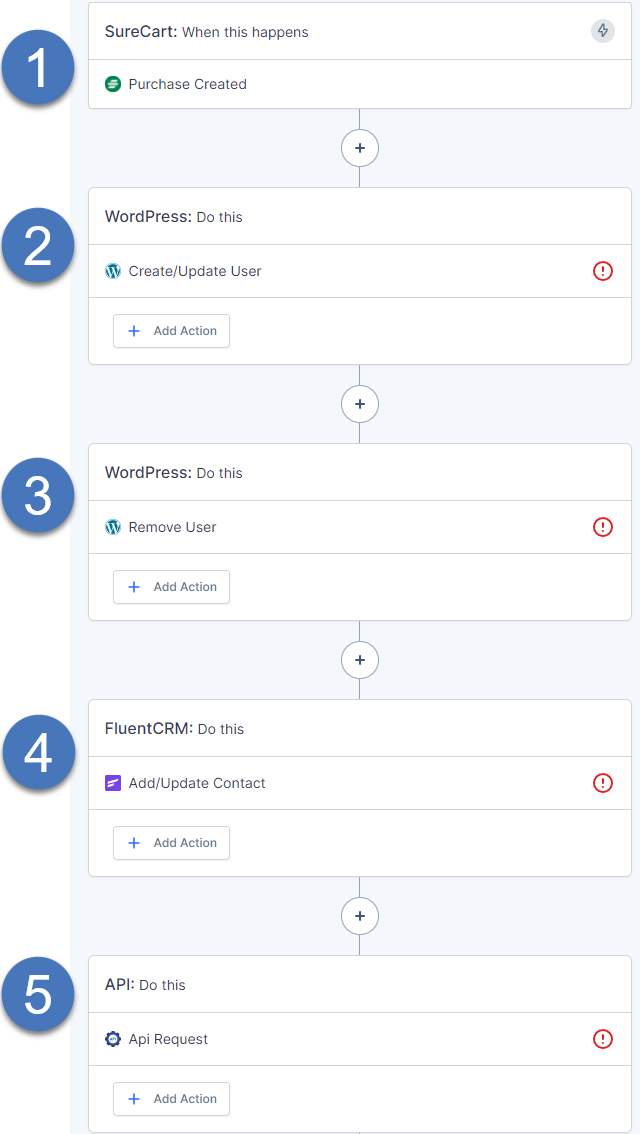
You only need a single workflow and I’ve outlined the overall steps below.
Before you begin, I recommend completing a test purchase with a test email so that when you “fetch data” in SureTriggers it is using you as the test subject and not a real customer. I recommend you do not use your primary email address. If you’re a Google Workspace or Gmail user, try adding a +modifier to your email.
For example: [email protected]
This creates an instant alias for you to use and you’ll still get your emails to your normal email address.

Step 1: SureCart Purchase Trigger
Select your SureCart account and the product that you want to be the trigger of this entire workflow. I like to use the “purchase created” trigger for this step.
Step 2: Create/Update User on Site 2
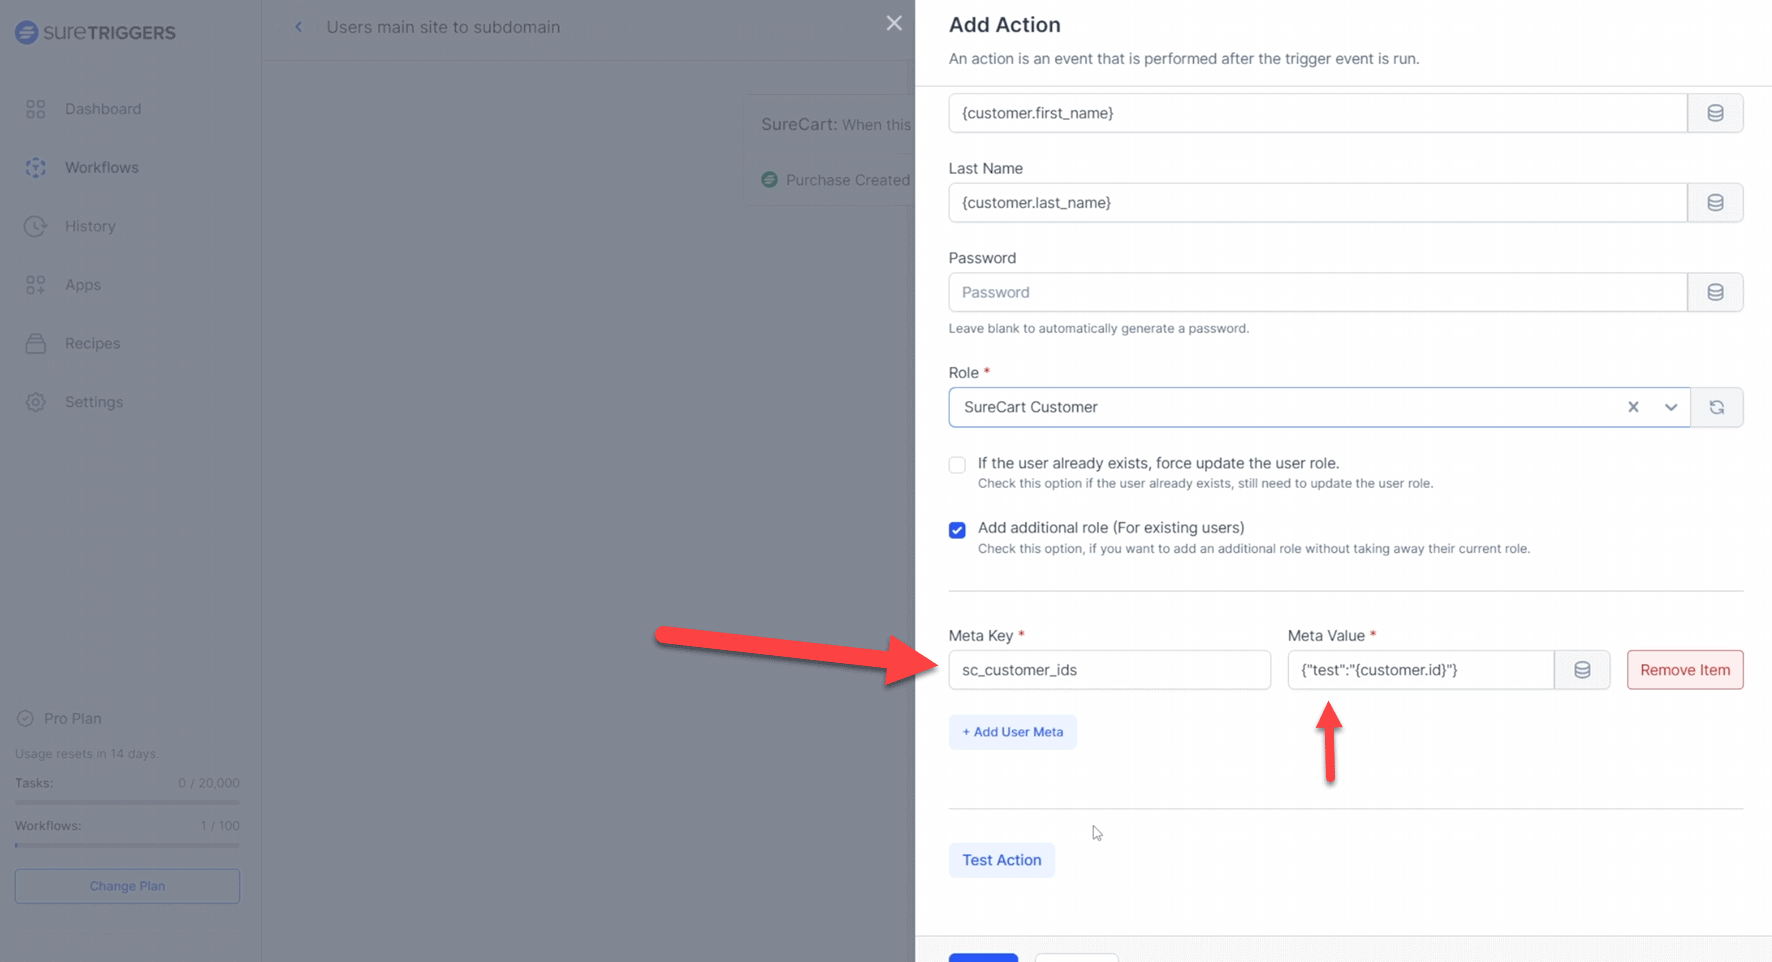
This step is complex and I highly recommend you watch the video tutorial.
You need to update the required fields and any optional fields you wish with the dynamic tags from the SureCart trigger. I recommend the SureCart Customer Role and for their username you can put their full name.

Click the + Add User Meta button.
WordPress Meta Key: sc_customer_idsMeta Values:TEST DATA: {“test”:”{customer.id}”}LIVE DATA: {“live”:”{customer.id}”
Step 3: Remove User from Site 1
If you do not wish for the user to have an account on Site 1, I recommend removing them. You can add a WordPress action and remove the user’s account. Simply map the dynamic email address.
Step 4: Connect Additional Tech
Next you can integrate with any of your favorite tech stack. The hard part of connecting the WP account data with the SureCart customer data on the second site is done.
If there’s an app that SureTriggers integrates with natively, like FluentCRM, you can add that here.
Step 5: Make API Calls and Send Webhooks
If there are tools that SureTriggers doesn’t natively integrate with, you can send a webhook or make an API call using the API trigger actions. One example use case here would be to automatically grant access to a Thrive Apprentice course or Product (like a membership) via a webhook over to Thrive Automator.

